Project Branch
Right click on the Project branch in the Project Tree panel to display the following menu:
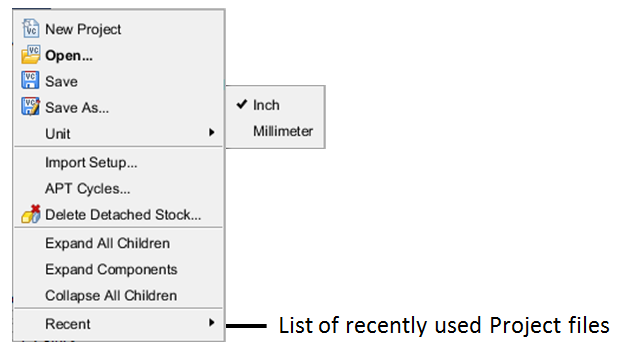
New Project — Displays the New Vericut Project window enabling you to create a New Project file.
Open — Displays the Open Project file selection window enabling you to open an existing project file.
Save — Use to save an existing project file with the current Vericut session settings.
Save As — Opens the Save Project As window, enabling you to save the current project file under a different name, or in a different location.
Unit — Enables you to change the units of the current project file. A check indicates the "current" units (Inch or Millimeter).
Import Setup — Opens the Import Setup window, enabling you to copy a setup from project file and append it after the current setup.
APT Cycles — Opens the Cycles window enabling you to maintain cycle and modal definitions.
Delete Detached Stock — Displays the Delete Detached Stock window enabling you to delete or keep pieces of material. This feature provides the same functionality as Project tab > Delete Detached Stock. See Delete Detached Stock section of Vericut Help for additional information.
Expand all Children — Expands all branches of the Project Tree.
Expand Components — Expands all child branches of the selected (highlighted) component.
Collapse all Children — Collapses all branches of the Project Tree.
Recent — Displays a list of recently used project files that you can select from.
Close — Closes the Project Tree panel.
If the Configure icon is toggled “on”, the Configure Project menu displays at the bottom of the Project Tree.
↘️ Shortcut: Double clicking on the Project Branch in the Project Tree will open the Open Project file selection window.
New Project
New Vericut Project window
Locations:
Project Tree > Project Branch Right Mouse Shortcut Menu > New Project
File tab >  (New Project)
Toolbar short cut for creating a New Project file: 
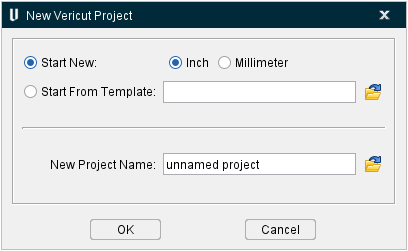
Selecting New Project displays the New Vericut Project window. The features on the New Vericut Project window enable you to create a new Vericut project file based on one of the Vericut provided project template files, or based on a "custom" project template file that you have created.
-
Start New — Use to set Vericut to a "new" condition, with no files loaded. To establish the new condition, Vericut purges all data from memory, and then opens the appropriate Vericut project template file, based on the Inch/Millimeter setting described below.
-
Inch — Use to create a new inch project file. The new project file is based on the init.VcProject project template located in the /library/ folder of your Vericut installation.
-
Millimeter — Use to create a new Millimeter project file. The new project file is based on the initm.VcProject project template located in the /library/ folder of your Vericut installation.
-
📝 NOTE: Inch and Millimeter are only applicable to the Start New feature. When using the Start From Template feature, described below, the "units" for the new project file will be set from the units stored in the selected project template file.
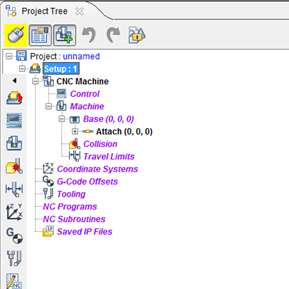
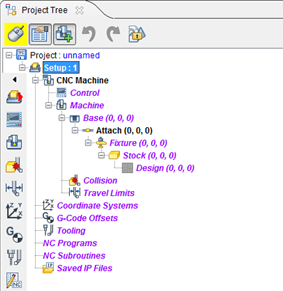
The Project Tree shown below is automatically defined in the new project file, ready for you to configure Vericut by adding models, NC programs, descriptions of cutting tools, etc.
| Project Tree after a new condition (Show Machine Components turned off): | Project Tree after a new condition (Show Machine Components turned on): |
|---|---|
 |
 |
Start From Template — Similar to the Start New feature described above except that the new project file is based on a "custom'' project template file and not on one of the Vericut supplied project template files. Enter the /path/filename of the project template file that you want to base the new project file on, in the Start From Template text field or click on the  (Browse) icon to display the Select Template Name file selection window and use it to specify the /path/filename.
-
New Project Name — Enter the /path/filename or the new project file in the New Project Name text field or click on the
(Browse) icon to display the Select Project Name file selection window and use it to specify the /path/filename. Make sure that you have "write" privileges to folder that you specify. If you do not specify a /path/filename, Vericut will assign the default name "unnamed.vcproject to the new project file and save it in your Working Directory. -
OK — Creates a new project file based on the settings in the New Vericut Project window, automatically saves the new project file to the specified location, and then closes the New Vericut Project window.
-
Cancel — Closes the New Vericut Project window without creating a new project file.
💡 Tips:
-
You can customize how Vericut establishes the new condition by making changes to the init.VcProject or initm.VcProject files. Store the changed files in your Working Directory, or the Vericut /library/ folder. See Create a custom Project Template File section of Vericut Help for additional information.
-
If needed, change the units for the new session as follows: Click in the graphics area with the right mouse button and then select Project Tree in the menu that displays. In the Project Tree panel, right click on the Project branch, and select Unit > Inch (or Millimeter) in the menu that displays. The current units are indicated by the check mark.
Create a New Vericut Project
Use the procedures described below to set Vericut to a "new" condition. This action clears all project-related information as if no files were loaded. After performing this action, configure Vericut by adding models, NC programs, descriptions of cutting tools, etc.
To start a new Vericut project using Vericut supplied templates:
-
Use one of the following methods to display the New Vericut Project window:
In the Project Tree, right-click on the Project branch and select New Project from the menu that displays.
In the Vericut menu ribbon, select File tab > New Project. -
In the New Vericut Project window, select the Start New feature and then verify that the correct units are selected. Reset if necessary.
-
Enter the /path/filename for the new project file in the New Project Name text field, or click on the
 (Browse) icon to display the Select Project Name file selection window and use it to specify the /path/filename.
 - Select OK to create the new project file based on the settings in the New Vericut Project window, automatically save the new project file to the specified location, and then close the New Vericut Project window.
To start a new Vericut project using a "custom" project template:
-
Use one of the following methods to display the New Vericut Project window:
In the Project Tree, right-click on the Project branch and select New Project from the menu that displays.
In the Vericut menu ribbon, select File tab > New Project. -
In the New Vericut Project window, select the Start From Template feature.
- Enter the /path/filename of the project template file to be used in the Start From Template text field, or click on the (Browse) icon to display the Select Template Name file selection window and use it to specify the /path/filename.
-
Enter the /path/filename for the new project file in the New Project Name text field, or click on the
(Browse) icon to display the Select Project Name file selection window and use it to specify the /path/filename. -
Select OK to create the new project file based on the settings in the New Vericut Project window, automatically save the new project file to the specified location, and then close the New Vericut Project window.
See Project File section of Vericut Help for additional information on Vericut project files.
Create a custom Project Template File
Use the procedure described below to set Vericut to a "new" condition. This action clears all project-related information as if no files were loaded. Then modify the Vericut provided Project Template file as necessary and then save the "custom" project template file with a new name.
-
Use one of the following methods to display the New Vericut Project window:
In the Project Tree, right-click on the Project branch and select New Project from the menu that displays.
In the Vericut menu ribbon, select File tab > New Project. -
In the New Vericut Project window, select the Start New feature and then verify that the correct units are selected. Reset if necessary.
-
Enter the /path/filename for the new project file in the New Project Name text field, or click on the
(Browse) icon to display the Select Project Name file selection window and use it to specify the /path/filename. -
Select OK to create the new project file based on the settings in the New Vericut Project window, automatically save the new project file to the specified location, and then close the New Vericut Project window. A new project based on one of the Vericut supplied project templates should be displayed in Vericut.
-
In the Project Tree panel, modify the project file (machine, control etc.) as needed so that reflects how you want a new project file to open.
-
When you are finished, save the project file. It can now be used as a project template file when creating a new project file. If needed, see Create a New Vericut Project section of Vericut Help for information on how to do this.
See Project File section of Vericut Help for additional information on Vericut project files.
Open Project window
Locations:
Project Tree > Project Branch Right Mouse Shortcut Menu > Open
Project Tree > Configure Project menu: Files tab
File tab >  (Open)
Toolbar short cut for opening Project files: ![]()
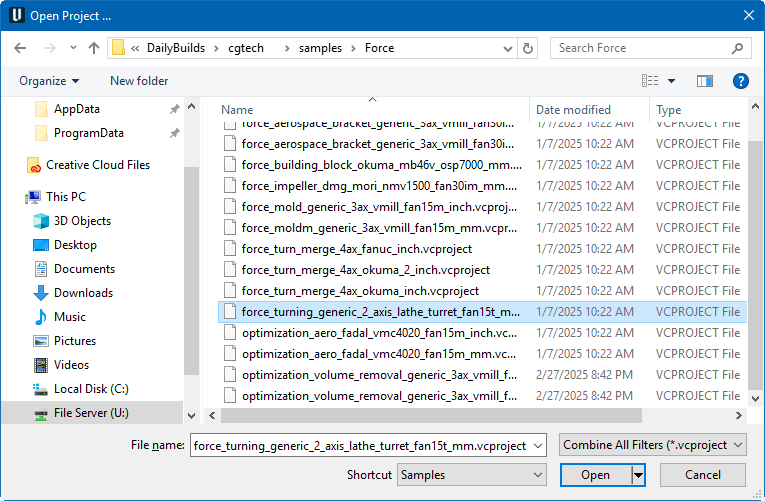
Use to open an existing Project file with the current Vericut session settings. Use the Open Project file selection window that displays to select the desired project file. Most features on this window are standard file selection window features that enable you to navigate through directories, filter files, and type, or select, /path/filenames. A description of features specific to Vericut can be found in the Introduction to Vericut File Selection Windows in the Getting Started section of Vericut Help.
Opening an Existing Vericut Project File
Vericut session settings, also known as "user configuration values" or "user values", can be saved in a Project file (.VcProject). Virtually everything changeable in the user interface can be saved in a Project file. Relatively small in size, Project files minimize the effort required to configure Vericut for processing multiple setup jobs.
To open an existing Project file:
-
Use one of the following methods to display the Open Project file selection window.
In the Project Tree, right-click on the Project Branch and select Open from the menu that displays.
In the Vericut menu ribbon, select File tab > Open Project.
In the Vericut toolbar, click in the (Open Project) icon.
 -
In the Open Project file selection window that opens, select, or type the /path/filename of the file to open.
-
Click Open. The Project file is opened. The current Project file name and unit measurement system are displayed in the Vericut window title bar.
See Project File section of Vericut Help for additional information on Vericut project files.
Save Project
Locations:
Project Tree > Project Branch Right Mouse Shortcut Menu > Save
Project Tree > Configure Project menu: Files tab
File tab >  (Save Project)
Toolbar short cut for saving Project files: ![]() (Save Project).
(Save Project).
Saves (updates) an existing Project file with the current Vericut session settings. Vericut will save the project file if you have sufficient permissions to save the file in its present folder. Otherwise, the Save Project As window will display enabling you to specify a location to save where you have write permissions.
See Saving a Vericut Project File section of Vericut Help for additional information.
Save Project As window
Locations:
Project Tree > Project Branch Right Mouse Shortcut Menu > Save As
Project Tree > Configure Project menu: Files tab
File tab >  (Save As)
Toolbar short cut for saving Project files as: ![]() (Save Project As)
(Save Project As)

Opens the Save Project As window enabling you to save Project files (ref. Project File section of Vericut Help). Most features on this window are standard file selection window features that enable you to navigate through directories, filter files, and type, or select, /path/filenames. A description of features specific to Vericut can be found in the Introduction to Vericut File Selection Windows in the Getting Started section of Vericut Help.
Saving a Vericut Project File
Vericut session settings, also known as "user configuration values" or "user values", can be saved in a Project file (.VcProject). Virtually everything changeable in the user interface can be saved in a Project file. Relatively small in size, Project files minimize the effort required to configure Vericut for processing multiple setup jobs.
To save a new Project file (or save an existing Project file under a new name):
-
Use one of the following methods to display the Save Project As file selection window.
In the Project Tree, right-click on the Project Branch and select Save As from the menu that displays.
In the Vericut menu ribbon, select File tab > Save As (Project).
In the Vericut toolbar, click in (Save Project) icon.
 -
In the window that opens, select, or type the /path/filename for the file to be saved.
-
Click Save. The project file is saved. At a later time, you can open the project file to reconfigure Vericut. If needed, see Opening an Existing Project File section of Vericut Help for additional information.
To save an existing Project file under the same name:
Use one of the following methods to save an existing project file under the same name.
In the Project Tree, right-click on the Project Branch and select Save from the menu that displays.
In the Vericut menu ribbon, select File tab > Save Project.
In the Vericut toolbar, click in the ![]() (Save Project) icon. The project file is saved. At a later time, you can open the project file to reconfigure Vericut. If needed, see Opening an Existing Project File section of Vericut Help for additional information.
(Save Project) icon. The project file is saved. At a later time, you can open the project file to reconfigure Vericut. If needed, see Opening an Existing Project File section of Vericut Help for additional information.
See Project File section of Vericut Help for additional information on Vericut project files.
Import Setup window
Locations:
Project Tree > Project Branch Right Mouse Shortcut Menu > Import Setup
Project Tree > Project Branch > Configure Project menu
Project tab >  (Import Setup)
Enables you to copy a setup from project file and append it after the current setup.
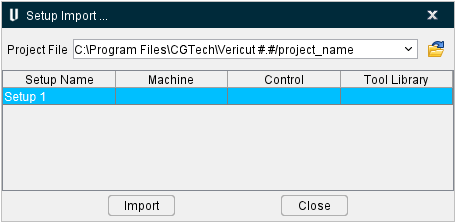
Project File selection window — Use the Setup Import file selection window to specify the project file that the setup is to be imported from.
- Setup List — After selecting the project file, a list of setups contained in the project file. Select one or more setups to be imported. Use the Shift and Ctrl keys on the keyboard to select multiple setups.
Import — Use to import the highlighted setups into the "current" project file.
Close — Closes the Import Setup window without importing any setups.
Import a Setup from Another Project File
Use the procedure described below to import a setup from a project file (.VcProject) and append it after the "current" setup in the "current" project file.
-
Use one of the following methods to display the Import Setup window:
In the Project Tree, right-click on the Project branch and select Import Setup from the menu that displays.
In the Project Tree, left-click on the Project branch to display the Configure Project menu and then select Import Setup.
In the Vericut menu ribbon, select Project tab > Import Setup. -
In the Import Setup window, select the /path/filename of the user/project file that contains the setup that you want to import. Once you specify the /path/filename, a list of all setups contained in the specified file is displayed in the lower portion of the Import Setup window. Each setup record displays the setup name and the machine, control and tool library used by the setup.
-
Click on the desired setup so that it becomes highlighted and then press the Import button. Vericut will add the imported setup after the "current" setup in the "current project file.
-
Repeat steps 2 and 3 to import additional setups.
-
When you are finished importing setups, click on the Close button to close the Import Setup window,
Cycles window
Locations:
Project Tree > Project Branch Right Mouse Shortcut Menu > APT Cycles
Project tab >  (Setting dropdown menu) > APT Settings > Cycle Definitions option
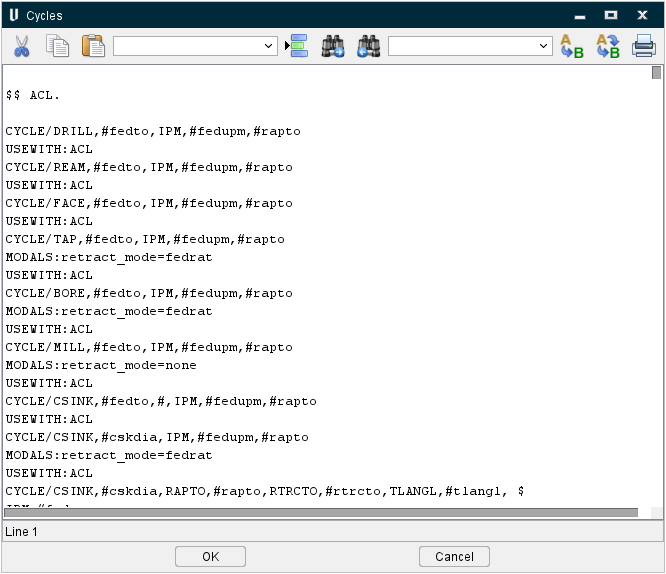
The Cycles window features enable you to maintain cycle and modals definitions used to interpret "CYCLE" records. This feature is especially useful if simulated cycle motions are not displayed as expected. When Vericut cannot find definitions to interpret a CYCLE record, an error similar to "Invalid CYCLE record" error is issued. In these cases, cycle definitions must be modified to correctly interpret the cycle data.
Icon Bar:
![]()
The items in the Icon Bar enable you to search for, and/or replace, specific items in the file listing, print the file, or exit the window. Moving the cursor over the icon will display name of the option. Each feature (from left to right) is described below.
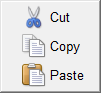
![]() Cut (Ctrl+X) — Cuts the highlighted text in the file listing and puts it in the paste buffer.
Cut (Ctrl+X) — Cuts the highlighted text in the file listing and puts it in the paste buffer.
![]() Copy (Ctrl+C) — Copies the highlighted text in the file listing to the paste buffer.
Copy (Ctrl+C) — Copies the highlighted text in the file listing to the paste buffer.
![]() Paste (Ctrl+V) — Puts the contents of the paste buffer at the location of the cursor in the file listing.
Paste (Ctrl+V) — Puts the contents of the paste buffer at the location of the cursor in the file listing.
Line Number or Search Text — Use this text field to enter a line number, or a string of text, to search for.
![]() Go to Line Number — Moves the cursor in the file listing to the line number specified in the Line Number or Search Text field.
Go to Line Number — Moves the cursor in the file listing to the line number specified in the Line Number or Search Text field.
 Search Forward — Searches forward in the file listing for the text string specified in the Line Number or Search Text field.
 Search Backward — Searches backward in the file listing for the text string specified in the Line Number or Search Text field.
Replacement Text — Use this text field to enter a "replacement text" string.
![]() Replace One — Replace one occurrence of text string in the Line Number or Search Text field (or the highlighted text in the file listing) with the text string in the Replacement Text field.
Replace One — Replace one occurrence of text string in the Line Number or Search Text field (or the highlighted text in the file listing) with the text string in the Replacement Text field.
![]() Replace All — Replace all occurrences of the text string in the Line Number or Search Text field with the text string in the Replacement Text field.
Replace All — Replace all occurrences of the text string in the Line Number or Search Text field with the text string in the Replacement Text field.
![]() Print — Print the file.
Print — Print the file.
OK — Accepts the changes and closes the Cycles window.
Cancel — Closes the Cycles window without accepting the changes.
↘️ Shortcut: Right-click in the Cycles window to display the following menu:
See Configuring for APT-CLS Cycle Simulation section of Vericut Help, for additional information.