Set Post Processor Options card
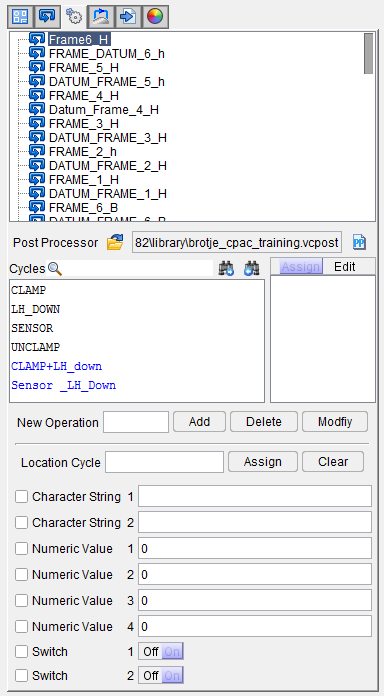
Sequence List — Displays a list of Sequences and data points that have been defined for the NC program.
![]() Post Processor — Click on the
Post Processor — Click on the ![]() (Browse for post-processor) icon to display the “Post Processor” file selection window and use it to specify the /path/filename of the post processor file that you want to use.
(Browse for post-processor) icon to display the “Post Processor” file selection window and use it to specify the /path/filename of the post processor file that you want to use.
 Search Cycles — Insert text string for search.
-
 Search Forward — Searches forward in the Cycle listing for the text string specified in Search Cycles field.
 -
 Search Backward — Searches backward in the NC program listing for the text string specified in Search Cycles field.
Cycle Options — The Cycle Options list, displayed on the left side of the Set Post Processor Option card, contains all of the cycle options that are available. Available cycle options come from one of two sources, the post processor file or the project file. Cycle options coming from the post processor file are displayed in black text. Cycle options coming from the project file are displayed in blue text.
Mode — The Set Post Processor Option card has two working modes, Assign and Edit. The mode is selected using Assign/Edit feature located above the list window on the right side of the Set Post Processor Option card as shown in the picture below.
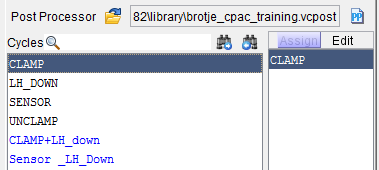
If the Set Post Processor Option card is currently set to Assign mode, click on Assign to change the Set Post Processor Option card to Edit mode. Conversely, if the Set Post Processor Option card is currently set to Edit mode, click on Edit to change the Set Post Processor Option card to Assign mode.
 (Assign mode) — Assign mode displays the
  (Assign selected cycle option to the selected location) icon above the top right corner of the Set Post Processor Option card, enabling you to assign specific cycle options to specific drilled hole/fastener locations in the Design Locations Table.
Click on the (Assign selected cycle option to the selected location) icon and select the cycle option from the list that displays to assign the selected cycle to the Cycle column of all selected (highlighted) rows in the Design Locations Table.
If you have the ![]() (Apply edits to all rows) icon above the Design Locations Table selected, the selected cycle option will be assigned to all rows in the Design Locations Table.
(Apply edits to all rows) icon above the Design Locations Table selected, the selected cycle option will be assigned to all rows in the Design Locations Table.
 (Edit mode) — Enables you to add cycles or edit the cycles available in the cycle Option list. To create a new cycle from existing cycles, select the cycles you want to combine in the Cycle Options list. Assign a name to the new cycle in New Operation and click Add The new cycle will appear in the Cycle Options list.
New Operation — This field is only displayed in Edit Mode. Enter the name you want to assign to the new cycle.
-
Add — Use to add the cycle specified in New Operation to the Cycle Options list. You can add as many cycles as desired.
-
Delete — Deletes the highlighted cycle from the Cycle Options list.
-
Modify — Use to change the cycles associated with the cycle specified in the New Operation list. In the Cycle Options list, select the cycles you want to assign to the cycle specified in New Operation and then click Modify.
Location Cycle —
-
Assign — Use to assign a cycle in the Cycle Options list to a selected data point. If you have the
 (Apply edits to all rows) icon above the Design Locations Table selected, the selected cycle option will be assigned to all rows in the Design Locations Table.
 -
Clear — Use to unassign a cycle from a selected data point in the Design Locations table. If you have the
(Apply edits to all rows) icon above the Design Locations Table selected, the selected cycle option will be clears from all rows in the Design Locations
Table.