Teamcenter
Locations:
Tool Manager > Tool Bar > Import tab >  (Teamcenter)
The Teamcenter command button provides access to the Import Teamcenter Tools window, enabling you to use Teamcenter tools. The Teamcenter Interface can be configured to use a “conventional login” or Single Sign On (SSO). See Configuring the Teamcenter Interface for details.
Using the Conventional Login method
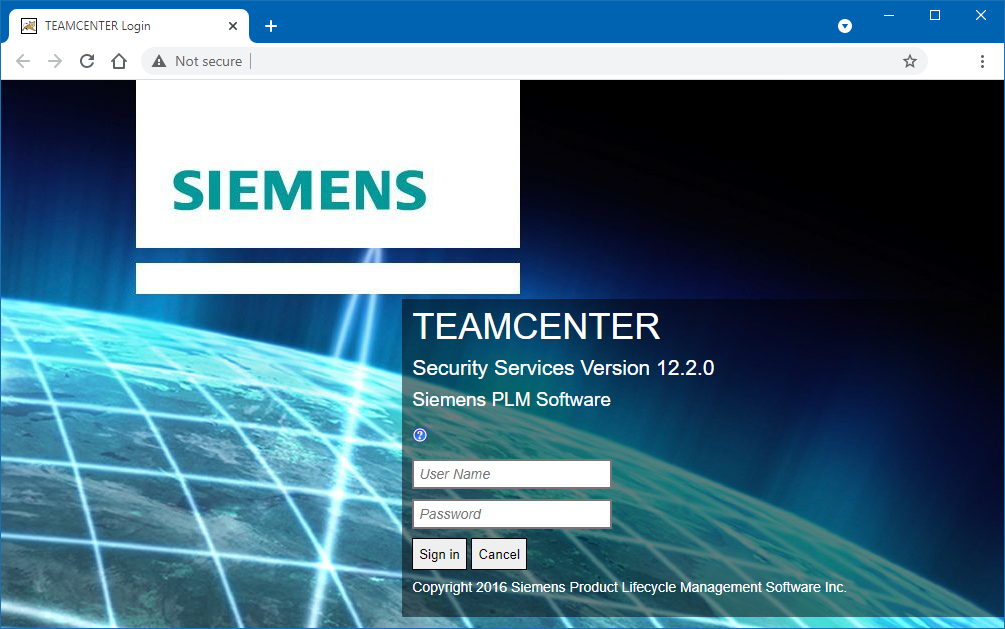
Select Teamcenter from the Import Tools pulldown menu. The Teamcenter Connection dialog appears, needing to be filled in. A completed Teamcenter Connection dialog should look like the following:

Server Connection
IP Address/Name — This is the IP Address to the Teamcenter server. Do not include the ‘http://’ in front of the address. An IP address alias (name) can also be entered if correctly defined correctly (I.e. Teamcenter.Vericut.com).
Port Number — This is the port number for the Teamcenter server. The default should be 8888 unless otherwise specified.
Login
User Name — This is the customer's explicit Teamcenter login. This information is stored in the .prefs file.
Password — This is the customer's explicit Teamcenter login. The password is not stored anywhere.
Group — This is an optional feature that is only used if the User Name belongs to multiple groups and one of those groups needs to log in specifically as that group.
Role — This is an optional feature that is only used if the User Name has multiple roles and one of those roles needs to log in specifically as that role.
Login — Use to login as the User Name. This feature does not work until a connection has been made. Once the login has been successfully completed, the Teamcenter Connection dialog automatically closes
Timeout Values
Read Timeout — Read timeout value, in milliseconds, to be used when reading from Input stream when a connection is established to a resource. If the timeout expires before there is data available for read, process execution stops and error message appears on the dialog.
Connect Timeout — Timeout value, in milliseconds, to be used when opening a communication link to the resource referenced by specified URL. If the timeout expires before the connection can be established, execution stops and error message appears on the dialog.
Connect — Use to connect once the server. Users must connect to the server before attempting login. Once a connection has been made, "Connection was successfully established with the Teamcenter server." displays at the bottom of the window. If the connection was unsuccessful, "Unable to connect to 'Teamcenter' server, please check the URL and try again." displays.
Tool Import Settings
Driven Point CSys — This is the name of the coordinate system defined on the 3D model for the tool tip. ‘CIP’ is the default.
Gage Point CSys — This is the name of the coordinate system defined on the 3D model for the Gage Point. ‘SIEMENS_TOOL_MOUNT’ is the default.
Cutter Portion
-
Solid Body Color — This is the color of the cutter portion of the cutting tool. The color is first looked for, then the Solid Body Name. The default color is defined per ISO 13399 standards.
-
Solid Body Name — This field is used to name the cutter portion of the cutting tool.
Message Field — This field displays various messages during the connection and login process to give feedback to the user.
OK — Closes the dialog once the user is finished. Once the connection, login, and any adjustments to the settings are made, use OK to close out the window and opent the Import Teamcenter Tools dialog.
Apply — Accepts any changes made while the window is open but does not close the dialog.
Cancel — Closes out the window without accepting any changes made during that session.
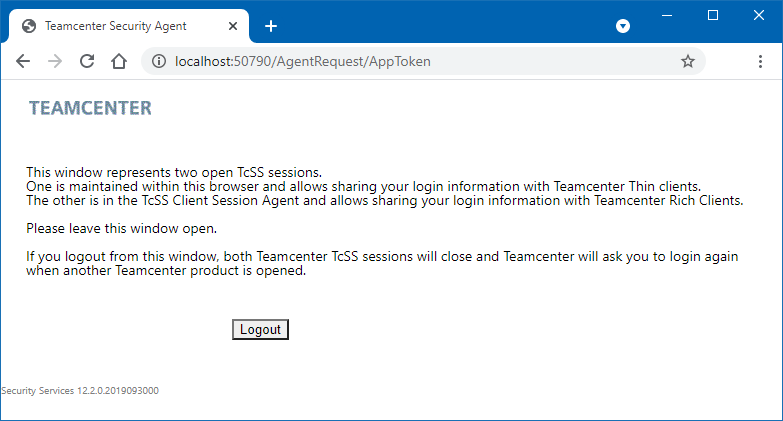
Using the Single Sign On (SSO) method
When SSO is configured, the Teamcenter icon will launch a browser window with the Teamcenter Security Services window prompting the user to enter their user name and password.
If the user has already successfully logged into another application using SSO (I.e. Teamcenter, computer login, etc.) the Teamcenter login browser window should be bypassed and immediately open the Import Teamcenter Tools window. A browser window will open showing connection using SSO.
Upon successful login a browser window will open showing connection using SSO. Do not close this window during your session.
Import Teamcenter Tools window
Once the Teamcenter Connection dialog has closed, the Import Teamcenter Tools window automatically displays.

Search Object
-
NX Projects — This is a filter which enables you to search NX CAM projects. During this search, two results fields display below: NX Projects and Tool Assemblies. Please note this option stays model from the previous time when the dialog was visited.
-
Tools — This is a filter which enables you to search cutting tool assemblies. During this search, only Tool Assemblies results are displayed.
Quick Search — This box is toggled on (checked) by default. Toggling this box off (unchecked) adds three additional columns below in the results fields: Ownder, Last Modified, and Release Status. Toggling this feature off will result in searches taking longer to generate results.
Connection Status Light — This light indicates the status of the connection. A red light indicates the connection has been lost. A green light indicates that there is a connection. If you need to open the Teamcenter Connection dialog, click the status light to open that window.
Search field — This field is used to type in the character string that the user is searching for. Once the character string has been entered, pressing the ENTER key on your keyboard will begin the search.
Binocular pulldown — This feature allows the user to search for the following fields within Teamcenter: Item ID or Item Name.
Tool Assemblies results section — Set by default to display 4 columns of information from the items found from the search.
Tool ID Source — Changes the names use for when the tools are imported. The two options available are: Item ID or Item Name.
Message Area — Displays any messages or responses to actions as needed. As multiple tools are imported, messages will display to gauge import progress.
Import Selected — This button is used when tools are selected to start the import process.
Close — This closes the window.
If a .tls file or .vcproject file containing tools that reference Teamceneter is opened, Vericut will launch the Teamcenter Connection dialog and once the connection and login goes through, the Teamcenter Revision Updates window displays ONLY if there are outdated tool prompting the user to address the highlighted differences.
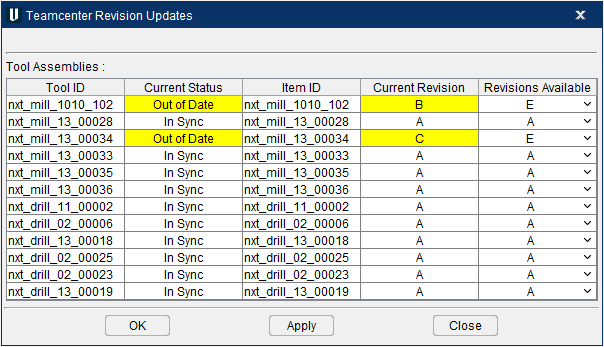
This window checks for each tool present and will highlight any tools that are found to be 'Out of Date.' Select a desired revision from the Revisions Available column to ensure that the tool will be 'In Sync' with Teamcenter and then select OK or Apply. If you do not wish to make the revisions, choose Close to skip the process.