Tooling Branch
Right-click on the Tooling Branch in the Project Tree panel to display the following menu:
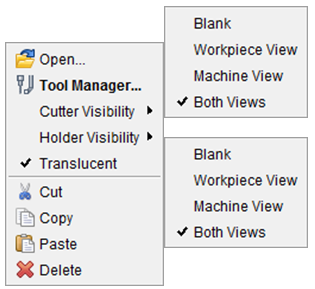
Open — Opens a file selection window enabling you to open a tool library file.
Tool Manager — Opens the Tool Manager window enabling you to create and maintain Vericut Tool Library files containing descriptions of cutting tools, or tool assemblies.
Cutter Visibility — Use the Cutter Visibility features to specify whether or not cutters are visible, and in what views. A check indicates “visible” in the view. The setting applies to all cutter components in the setup.
-
Blank — Cutters are not visible in any view.
-
Workpiece View — Cutters are only visible in a Workpiece View.
-
Machine View — Cutters are only visible in a Machine View.
-
Both Views — Cutters are visible in any view.
Holder Visibility — Use the Holder Visibility features to specify whether or not holders are visible, and in what views. A check indicates “visible” in the view. The setting applies to all holder components in the setup.
-
Blank — Holders are not visible in any view.
-
Workpiece View — Holders are only visible in a Workpiece View.
-
Machine View — Holders are only visible in a Machine View.
-
Both Views — Holders are visible in any view.
Translucent — When toggled “on” (checked), visible cutters and holders are displayed in translucent mode. When toggled “off” visible cutters and Holders are displayed in solid mode.
Cut — Cuts the highlighted tool library from the Project Tree and puts it in the paste buffer.
Copy — Copies the highlighted tool library from the Project Tree to the paste buffer.
Paste — Replaces the highlighted tool library, with the tool library contained in the paste buffer.
Delete — Deletes the highlighted tool library from the Project Tree.
↘️ Shortcut: Double clicking on Tooling in the Project Tree panel will open the Tool Manager window.
Tools Used
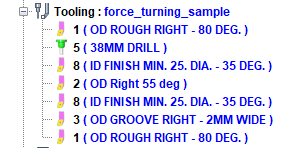
The Tools Used feature enables you to see at a glance the tools that are being used for the “current” Setup. At each tool change in the simulation, an image representing the tool component type along with the tool’s ID is added to the Tooling branch in the Project Tree. If the tool in Tool Manager has the Description field filled in, that description will also be displayed in the Project Tree as shown in the picture below.
The following are the tool component types that may appear in the list.
The tools are shown in the order in which they were used. The last tool in the list is the “active” tool. This feature is only available for tools that are contained in a Tool Library. Tools defined within an APT NC program will not be displayed in the Tools Used list.
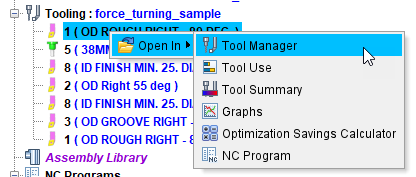
If you right-mouse click on a tool in the list, and then click on the Tool Manager option that displays as shown in the picture below. Alternatively, you can double click on a tool in the list to display the Tool Manager.
Click on a tool in the Tools Used list and a 3D image of the tool will display in the Configure menu area of the Project Tree as shown in the picture below.
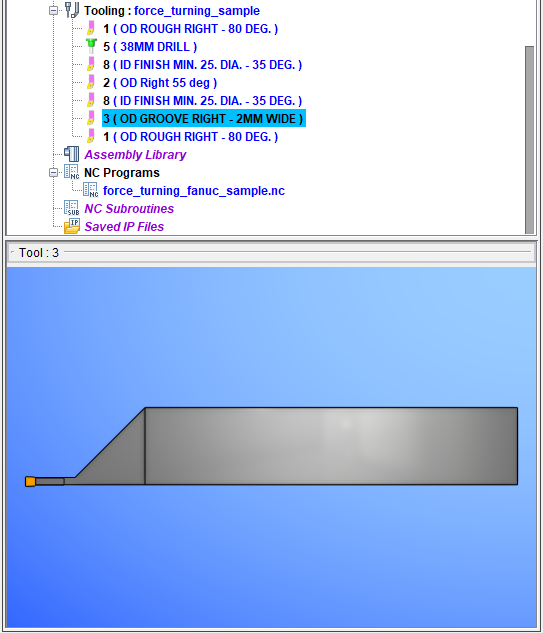
Left clicking on the 3D image and moving the cursor allows dynamic rotation of the tool.
Right click on the image to display the following menu:

Radial Menu
Fit — "Fits" the objects in the view. (ref. View Orient window, in the View tab section of Vericut Help)
Zoom to Box — Left-click and move mouse to trap area to zoom (press
Reverse — Reverses viewing direction, as if you stood behind the object.
Snap to Orthogonal View — Snaps the current view to the closest orthogonal view. Orient the view so that it is close to the orthogonal view that you want and then click on the Snap to Orthogonal View in the menu and the view will re-orient to the exact orthogonal view.
RMB Menu
Open In — This generates a popup menu of options where the tool can be viewed in more detail. Current options include: Tool Manager, Tool Use, Tool Summary, Graphs, Optimization Savings Calculator, and NC Program. Click on any of these links to be navigated to the Help topic that explains these features in more detail.