Hole Depth group
The command buttons in the Hole Depth group enable you to measure the depth of a hole, the depth of a countersink or the depth of a counterbore.
 Hole Top — This is the feature that defines the top of the hole (generally a plane).
Location — Represents the XYZ coordinates of the screen pick.
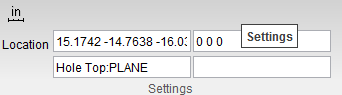
Vericut uses data from the screen pick to fill in the "feature type" and the Location data field in the X-Caliper Settings group as shown in the picture below. After the Hole Top has been selected, Hole Bottom becomes active.
 Hole Bottom — This is the feature that defines the bottom of the hole.
Location — Represents the XYZ coordinates of the screen pick.
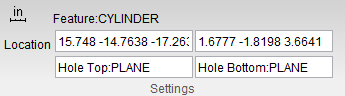
Vericut uses data from the screen pick to fill in the "feature type" and the Location data field the Settings group as shown in the picture below. After the Hole Bottom has been selected, Feature becomes active.
 Feature — Use to specify the feature that you want to measure.
In the picture above, the Location fields display the plane representing the top of the hole, the plane representing the bottom of the hole and the feature that was measured, in this case a cylinder.
Using the command buttons in Hole Depth
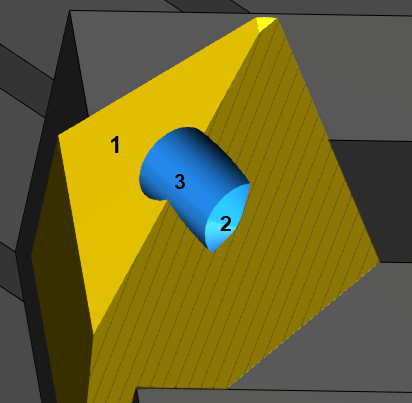
Refer to the picture of the hole cross section above for the following example.
To measure the depth of the hole:
-
In the Hole Depth group, click on
 (Hole Top), and then pick the feature representing the top of the hole. In this case it is a plane represented by 1 in the picture.
 -
In the Hole Depth group, click on
 (Hole Bottom), and then pick the feature representing the bottom of the hole. In this case it is a cone represented by 2 in the picture.
 - In the Hole Depth group, click
 (Feature), and then pick the feature that you want to measure. In this case it is a cylinder represented by 3 in the picture.
X-Caliper will calculate the depth from the intersection of the plane and the cylinder to the intersection of the cone and the cylinder.
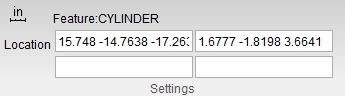
X-Caliper will display the information shown in the Vericut Logger panel and in the X-Caliper Settings group.
To measure the depth of the top countersink/counterbore:
-
In the Hole Depth group, click on
(Hole Top), and then pick the feature representing the top of the hole. -
In the Hole Depth group, click on
(Hole Bottom), and then pick the feature representing the bottom of the hole. - In the Hole Depth group, click (Feature), and then pick the feature that you want to measure. X-Caliper will return the information shown in the Vericut Logger panel below. X-Caliper will calculate the depth from the intersection of the plane and the cone to the intersection of the cone and the cylinder.
- In the Feature/History panel, pick the cone. X-Caliper will display the information shown in the Vericut Logger panel below. The angle value shown represents ½ of the included angle.
The information is also displayed in the X-Caliper Settings group as shown in the below example: