Batch Vericut
Batch Script Files
Multiple Vericut batch sessions can be run via a single executable command by including Vericut batch commands in an executable script file. The script file is then submitted to the operating system for processing. After each batch execution terminates, the operating system then executes the next command in the script file.
Batch files for different operating systems differ slightly in format. Details will follow later in this document. In general, each batch command in the script file appears as it would when entered by itself on the command line. Other operating system commands, such as those that delete or rename files can also be included in the script file.
💡 Tip: Vericut batch files can be easily created using Vericut's Batch Wizard.
A batch file to be run on Windows is named with a ".bat" extension, for example "batchfile.bat". Windows batch execution lines in the script file are "called" via the "call" command to return control to the script file after each Vericut execution. The examples that follow show two sample script files.
Windows batch script file examples:
Example 1 executes two batch sessions, each processing a part unrelated to the other.
call vericut batch "vcp=part1.VcProject"

call vericut batch "vcp=part2.VcProject"
Example 2 represents a part machined in two setups: the first is configured to automatically save an In-process file named "setup1.ai" via the AutoSave function. The second uses the ip=
call vericut batch "vcp=setup1.VcProject"

call vericut batch "vcp=setup2.VcProject" "ip=setup1.ai"
Batch Processing
Running Vericut in batch automates the verification process by loading requested Vericut files, processing the NC program file, and exiting Vericut-all without opening the Vericut window. Other command line options are commonly used to specify the Vericut Project file(s) and/or IP file(s) needed for the simulation, perform Vericut functions, and change Vericut variable values. See "Command line options" for more information.
Vericut is run in batch mode (unattended in the background) by including the "batch" command line option, or via the Batch Wizard. Another form of batch processing, "batchp", displays the Vericut window when finished to reveal the cut workpiece. You can run other applications, or perform other tasks while Vericut is processing in batch mode.
The same Vericut security and computer resources are required to run Vericut in batch as required during interactive processing. Logging out after initiating a batch session has no effect on the process, as long as the computer remains active.
The following simple examples run Vericut as configured by the previously created "part.VcProject" project file:
vericut batch “vcp=part.VcProject” (Windows)
The values stored in the Project file provide information about the stock model to machine, tool path file(s) to process, orientations of the models and tool paths, type of machining to simulate, etc. In this above example the following actions occur:
-
Vericut is executed.
-
Load the "part.VcProject" project file.
- Press Play to start the simulation. (Also writes a Log file containing errors and other information about the simulation.)
- When finished, exit Vericut.
For greater automation, multiple batch execution commands can be compiled in an executable batch script file, as described by the sections that follow.
Batch Wizard
The Batch Wizard graphically guides you through setting up and running Batch Session Files (.vcs), also called Batch Script Files. Batch mode runs Vericut products unattended in the background. Command line options and configuration files control the batch process without opening the Vericut window. This enables you to run other applications, or perform other tasks while Vericut products are being productive.
Batch session files created by the Batch Wizard are computer independent, and can be run on any computer that is capable of running Vericut.
Accessing the Batch Wizard
From the Taskbar, click Start > All Programs > Vericut 9.7 > Utilities > Batch Wizard.
Sample Batch Wizard window:
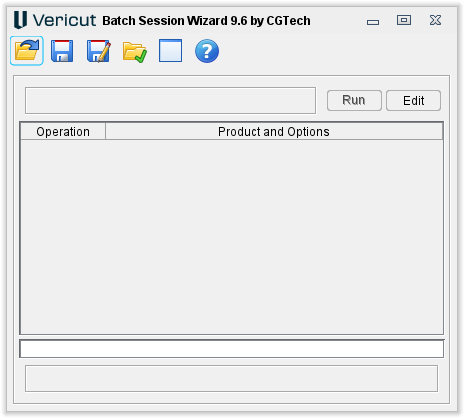
Batch Wizard Main window
The features on the Batch Wizard main window enable you to create a new batch session file, modify, and/or run an existing batch session file. Batch session files created by the Batch Wizard are computer independent, and can be run on any computer that is capable of running Vericut.
Icons

The icons located across the top of the Batch Session Wizard window provides easy access to major Batch Wizard functions. Click with the left mouse button on any icon that you want to use.
-
Open — Displays a file selection window enabling you to select an existing Batch Session File (ref. Batch Script Files in the Vericut Help section, in the Vericut Help Library)
-
Save — Use to save the current Batch Session file.
-
Save As — Save the current Batch Session file under a different name.
-
Working Directory — Opens the Working Directory selection window enabling you to specify a working directory.
-
Run Messages — Opens the Batch Session Wizard Run Messages window. This window contains the same information as the Batch Session Run Status area of the Batch Wizard main window, described below, but enables you to see large numbers of status messages at the same time.
-
On Automating Vericut — Opens the Automating Vericut section of the Vericut Help Library.
Current Batch Session File
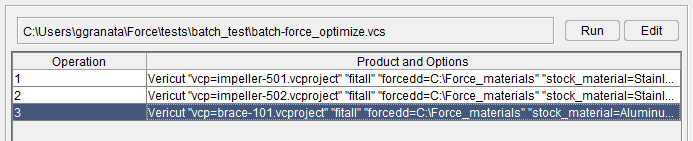
The /path/filename of the current Batch Session file, as well as a list of the operations contained in it, are displayed in this part of the Batch Wizard main window.
Run — Use to run the current Batch Session file. This provides the same functionality as the Operations > Run feature in the main menu, described above.
Edit — Opens the Batch Session Wizard Editor window enabling you to add, modify, or delete operations from an existing Batch Session file, or to add operations to create a new Batch Session file. This provides the same functionality as the Operations > Edit feature in the main menu, described above.
Batch Session Run Status

The bottom portion of the main window shows the status of the of the Batch Session file that is running. Information like which operations have finished executing, errors related to those operations, which operation is currently executing, as well as notification when the Batch Session file is finished running.
📝 Tip: You can change the size of the Current Batch Session File list area and the Batch Session Run Status listing area by left-clicking on the divider between these two areas and dragging up or down. Drag the window divider up to make the Batch Session Run Status area larger and the Current Batch Session File area smaller. Dragging the divider down has the opposite effect.
Batch Session Editor window
Accessed using the Edit button on the Batch Wizard Main window, the features on this window are used to add, modify, or delete batch operations in the current Batch Session file.
In general, press Next to go to the next window, Back returns to the previous window. When the batch session setup is complete, you return to the Batch Wizard Main window where you can save, and then run the batch session file.
The following describe the Batch Wizard windows that guide you through the process of setting up a batch session file.
Main window
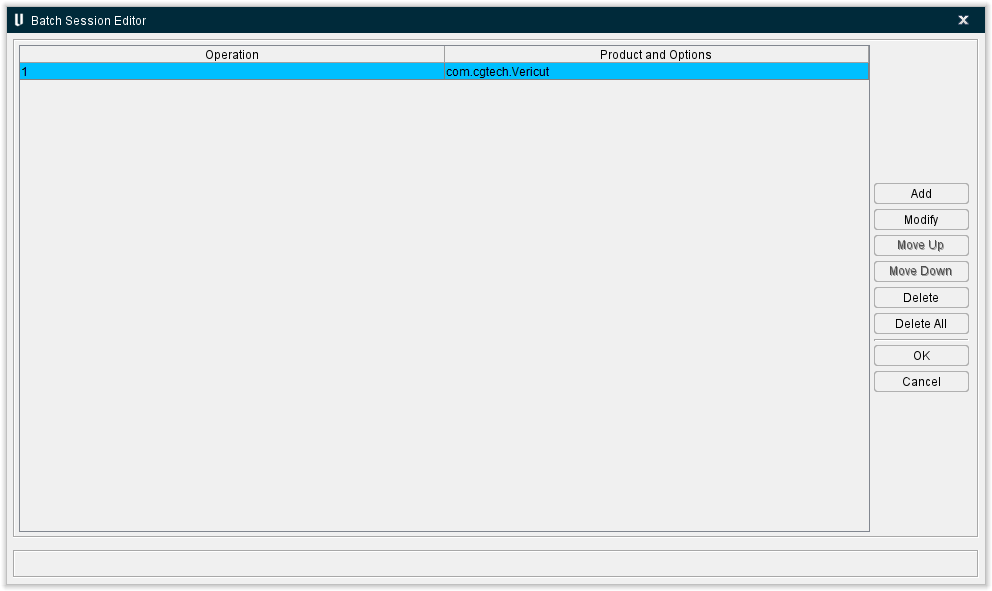
Add — Opens the Vericut Product window enabling you to start adding a new operation to the current Batch Session file. The new operation is added at the end of the operation list. You can then use Move Up feature, described below, to change its position in the Operation list.
Modify — Opens the Vericut Product window enabling you to modify an existing operation. Select the operation that you want to modify so that it becomes highlighted, then select Modify open the Vericut Product window.
Operations are performed in order that they appear in the Operation list. Use the Move Up / Move Down buttons to change an operation's position in the list.
Move Up — Each time you click on the Move Up button, the highlighted operation moves one position higher in the Operation list.
Move Down — Each time you click on the Move Down button, the highlighted operation moves one position lower in the Operation list.
Delete — Use to delete the highlighted operation from the Operation list.
Delete All — Use to delete all operations from the Operation list.
OK — Use OK to accept all of the changes that you made while in the Batch Session Wizard Editor, close the Batch Session Wizard Editor window, and return to the Batch Wizard Main window where you can save the Batch Session file, and then run it.
📝 NOTE: Using OK adds the changes you made in the editor to the active copy of the current Batch Session file. The changes are not permanently saved until you use Save or Save As in the File menu in the Batch Wizard Main window.
Cancel — Close the Batch Session Wizard Editor window without adding any changes to the active copy of the current Batch Session file, and returns to the Batch Wizard Main window.
Vericut Product window
This screen is used to specify which Vericut product will be run in the batch operation. The choices include Vericut, Vericut Converters, or Operating System Commands.
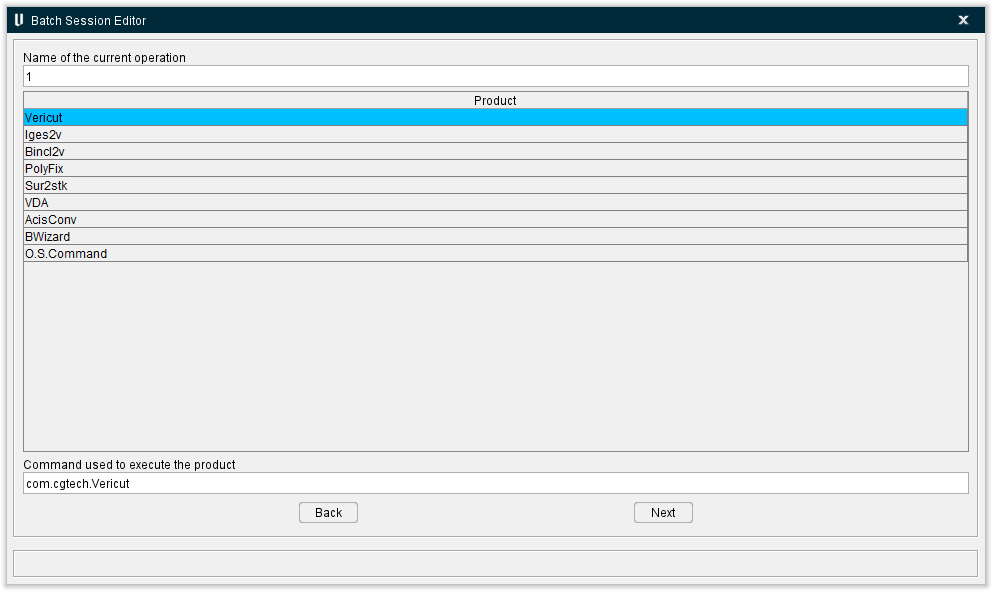
Name of the current operation — Use the text field to enter name for a new operation, or edit the name of an existing operation. Operations can be named anything you like.
Product — Select one of the products from the list to be run in the batch operation.
-
Vericut — Use Vericut for the batch operation.
-
Iges2v — Use the IGES Converter (ref. IGES Converter, in the Vericut Converters and CAD/CAM Interfaces section, in the Vericut Help Library) for the batch operation.
-
Bincl2v — Use the Binary CL Converter (ref. Binary CL Converter, in the Vericut Converters and CAD/CAM Interfaces section, in the Vericut Help Library) for the batch operation.
-
PolyFix — Use the PolyFix Converter (ref. PolyFix Converter, in the Vericut Converters and CAD/CAM Interfaces section, in the Vericut Help Library) for the batch operation.
-
Sur2stk — Use the Surface to Solid Converter (ref. Surface to Solid Converter, in the Vericut Converters and CAD/CAM Interfaces section, in the Vericut Help Library) for the batch operation.
-
VDA — Use the VDAFS Converter (ref. VDAFS Converter, in the Vericut Converters and CAD/CAM Interfaces section, in the Vericut Help Library) for the batch operation.
-
AcisConv — Use the Acis Converter (ref. CAD Model Converter, in the Vericut Converters and CAD/CAM Interfaces section, in the Vericut Help Library) for the batch operation.
-
BWizard — Use the Batch Wizard to run the batch operation.
-
O.S.Commands — Use an operating system command to assist with batch processing.
Command used to execute the product — Use the text field to enter the command to start the selected product.
Back — Returns to the Batch Session Wizard Editor Main window without making any changes.
Next — The Next button will behave differently depending on the product that has been selected (highlighted) for the batch operation.
If O.S.Commands is highlighted, the Next button will display the Operating System Command Options window enabling you to specify operating system commands to assist with batch processing, such as: copy, move, append, rename, and set environment variables.
If any product other than O.S.Commands is highlighted, the Next button will display the Command Line Options window, with the command line options that are appropriate for the highlighted product display in the Available Options list of the window.
For information on specific command line options, refer to Command Line Options for Vericut, and Command Line Options for Vericut Converters, also in the Automating Vericut section of the Vericut Help Library.
Command Line Options window
Accessed by selecting the Next button in the Vericut Products window when any product other than O.S.Commands is highlighted, the Command Line Options window is used to choose one, or more, command line options for the product being run in batch. The command line options in the Options Available list are specific to the product that was highlighted in the Vericut Product window.
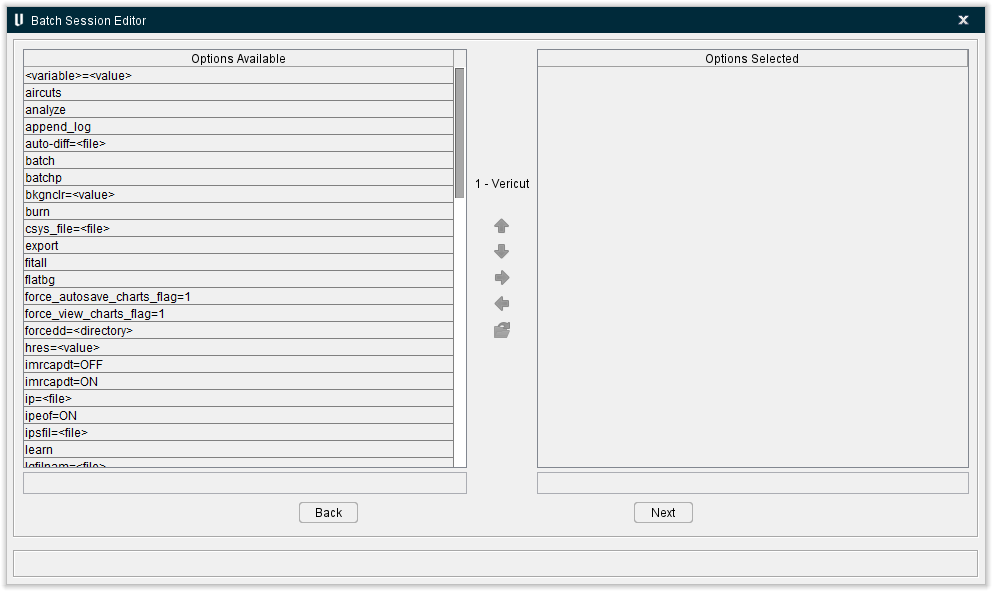
Options Available list — The command line options that appear in the Options Available list are specific to the Vericut product that is specified to run this operation. Selecting an item in the list causes it to become highlighted. If the selected item requires a file to be specified, it will display in the text field below the Options Available list so that you can enter the /path/filename of the required file. You can also click on  (File Selection) to display a file selection window and use it to specify the /path/filename. Click on (Add) to add the highlighted command line option to the Options Selected list.
 (Move Up) — Use to change the order of the items in the Options Selected list. Each time you click on the button, the highlighted option moves one position higher in the list.
 (Move Down) — Use to change the order of the items in the Options Selected list. Each time you click on the button, the highlighted option moves one position lower in the list.
 (Add) — Adds the option highlighted in the Available Options list to the Options Selected list.
 (Remove) — Removes the option highlighted in the Options Selected list from the list.
(File Selection) — Displays a File Selection window enabling you select the /path/filename for command line options requiring a file to be specified.
Options Selected list — The command line options that appear in the Options Selected list are the command line options that will be executed for the operation when you run the Batch Session file. Be sure to include one of the batch options (batch or batchp) to run the Vericut product in batch mode.
Back — Returns to the Vericut Product window without making any changes.
Next — Accepts the operation values as you defined them, closes the Command Line Options window and returns to the Batch Session Wizard Editor window.
For information on specific command line options, refer to Command Line Options for Vericut, and Command Line Options for Vericut Converters, also in the Automating Vericut section of the Vericut Help Library.
Operating System Command Options window
Accessed by selecting the Next button in the Vericut Products window when O.S.Commands is highlighted, the Operating System Command Options window is used to add operating system commands to the batch session file to assist with batch processing.
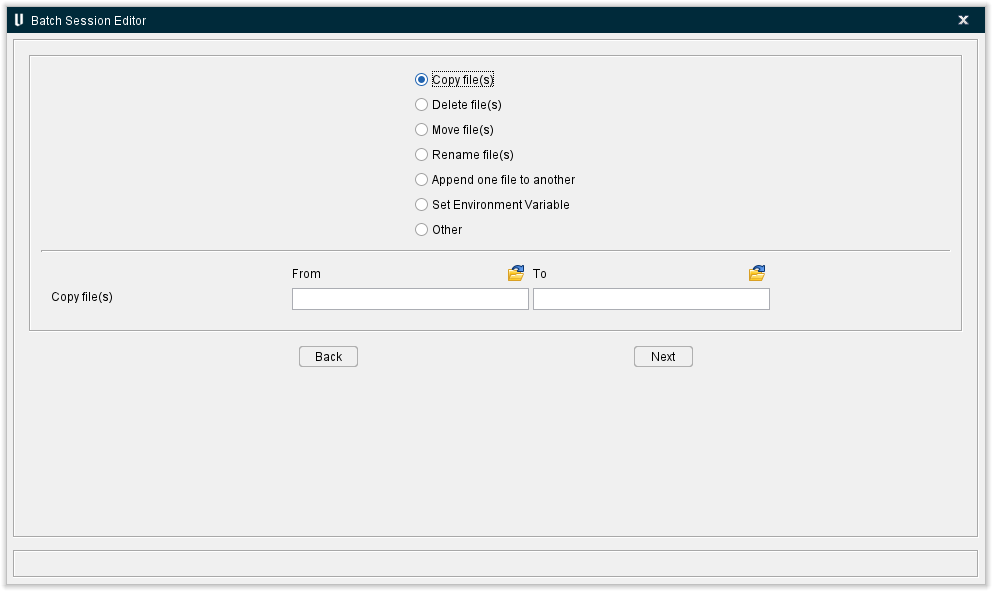
When you select one of the operating system command types in the upper part of the window, the lower part of the window will change to help guide you through specifying the information necessary for the selected operating system command.
As you will see in the following examples you can use simple inputs, as well as use wildcards (.log, *., etc.), "relative" directory paths, and environment variables to define the operating system commands.
In all cases, you can use (File Selection) to display a file selection window to assist you in specifying the required /path/filename(s).
Copy file(s) — Enables you to copy one, or more, file(s) from one directory to another. Enter the /path/filename(s) of the file(s) to be copied in the From text field, or use the file selection icon to open a file selection window and use it to assist you in specifying the /path/filename(s). Similarly, use the To text field to specify the new /path/filename(s) of the new location.
Delete File(s) — Enables you to delete one, or more, file(s). Enter the /path/filename(s) of the file(s) to be deleted in the text field, or use the file selection icon to open a file selection window and use it to assist you in specifying the /path/filename(s).
Move File(s) — Enables you to move one, or more, file(s) from one directory to another. Enter the /path/filename(s) of the file(s) to be moved in the From text field, or use the file selection icon to open a file selection window and use it to assist you in specifying the /path/filename(s). Similarly, use the To text field to specify the new /path/filename(s) of the new location.
Rename File(s) — Enables you to rename one, or more, file(s). Enter the /path/filename(s) of the file(s) to be renamed in the From text field, or use the file selection icon to open a file selection window and use it to assist you in specifying the /path/filename(s). Similarly, use the To text field to specify the new file names.
Append one file to another — Enables you to append the contents of one file to the end of another file. Enter the /path/filename(s) of the file containing the data that you want to append in the From text field, or use the file selection icon to open a file selection window and use it to assist you in specifying the /path/filename. Similarly, use the To text field to specify the /path/filename of the file that you want the data appended to.
Set Environment Variable — Enables you to set the value of an environment variable. Enter the name of the environment variable to be set in the Environment Variable text field. Enter the value of the environment variable in the To text field. Use the file selection icon to open a file selection window and use it to assist you in specifying the value of the environment variable if appropriate.
Other — Enables you to define a generic operating system command. Enter any command that your operating system will understand in the text field. Use the file selection icon to open a file selection window and use it to assist you in specifying the operating system command if appropriate.
Back — Returns to the Vericut Product window without making any changes.
Next — Accepts the operating system commands as you defined them, closes the Operating System Command Options window, and returns to the Batch Session Wizard Editor window.
Configuring for Batch Process Output
Output from running Vericut in batch always includes a Log file. Vericut can also be configured to automatically perform many operations, or output many different types of files. The following sections describe how to configure Vericut for batch process output.
See the Vericut Help section, in the Vericut Help Library, for additional information on any of the Vericut windows, or files, referred to in the following examples.
To batch save IP or View Capture files:
- Configure Vericut for processing the desired Project file (models, NC Programs, tools, etc.)
- Click Project tab > Settings window > AutoSave tab to display the AutoSave window.
- Click on either the In Process tab (if configuring to automatically save IP files), or the View Capture tab (if configuring to automatically save View Capture image files). If saving View Capture image files, then click on Properties on the View Capture tab to display the View Capture window and use its features to configure the desired image file format.
- In either case, use the Auto Save features select the event(s) and enter supporting data that will cause Vericut to automatically save the file. Type the name to be used for the file in the text field, or click on Browse and use the window that displays to specify the /path/filename for the file.
-
Use the Auto Error features to have Vericut automatically save the file when an error is encountered. Toggle the "On" checkbox on and type the name to be used for the file in the text field, or click on Browse and use the window that displays to specify the /path/filename for the file.
📝 NOTE: If using both Auto Save and Auto Error, be sure to use different file names for each to avoid overwriting. -
Press OK.
- Save a Project file (or IP file) to be used during the batch process, for example "test.VcProject"
- Exit Vericut
- To start batch processing use the Batch Wizard, or execute Vericut with vcp=
and batch (or batchp) command line options, for example:
vericut batch vcp=test.VcProject
To batch compare design models using AUTO-DIFF:
-
Configure Vericut for processing the desired project file (models, tool path, tools, etc.)
-
Depending on the AUTO-DIFF comparison method to be used, ensure a Design Solid, Surface or Point model is loaded (ref. Modeling Window in the Vericut Help section).
- Click Analysis tab > AUTO-DIFF to display the AUTO-DIFF window.
- Configure the AUTO-DIFF features as required to compare with the design model and show gouge, and/or excess conditions.
- Press Apply, and then close the AUTO-DIFF window.
- Save a Project file (or IP file) to use during the batch process, for example "test.VcProject"
- Exit Vericut
- To start batch processing use the Batch Wizard, or execute Vericut with vcp=
, auto-diff= , and batch (or batchp) command line options, for example:
vericut batch vcp=test.VcProject auto-diff=test.rpt
To batch optimize NC program files using Optimization:
- Configure Vericut for processing the desired project file (models, tool path, tools, etc.), and optimizing the desired tools.
The following steps assume that an Optimization Library file exists containing the desired optimization data and that Vericut has already been configured to optimize NC programs. If the library does not exist or does not contain all of the desired optimization data, use the Optimize Control window to create this file. Use the Tool Manager window and the Optimize Control window features to configure Vericut for optimization.
-
Click Optimize tab > Optimize Control to display the Optimization Control window.
-
Ensure the window is configured as required (Optimization Library file name, Material, Machine, etc.) to optimize the desired tools. Do not turn optimization On in this window to start tool path optimization, as this will be done via the "optimize" command line option.
- Press OK.
- Save a Project file (or IP file) to use during the batch process, for example "test.VcProject"
- Exit Vericut
- To start batch processing use the Batch Wizard, or execute Vericut with vcp=
, optimize, and batch (or batchp) command line options, for example:
vericut batch vcp=test.VcProject optimize