CATIA V5-to_VERICUT Drilling and Fastening Interface (CAT2VDAF5)
Overview
CAT2VDAF is a licensed software program that provides a CATIA V5 to Vericut Drilling and Fastening (VDAF) data transfer connection. The interface is an executable that is designed to work with CATIA V5.
Software Requirements: CATIA V5 VDAF Interface
Licensing Requirements
CGTech Licensing:
CATIA V5 Interface
Installation & Configuration: CATIA V5 VDAF Interface
User Configuration
No manual configuration required, The interface is pre-configured for seamless operation.
Installation Path
The interface installation files are located at:
C:\Program Files\CGTech\Vericut x.x.x\windows64\catv5_2vdaf
To access version details, use:
C:\Program Files\CGTech\Vericut x.x.x\windows64\commands\catv5_2vdaf.bat
Environment variables: CATIA V5 VDAF Interface
To enable the CATIA V5 VDAF Interface to locate the necessary Vericut files, the following environment variables are available:
Environment Variables: Description & Example
CGTECH_INSTALL
Purpose: Defines the Vericut installation folder.
Example: For Vericut 9.7, set to: C:\Program Files\CGTech\Vericut 9.7
CGTECH_PRODUCTS
Purpose: Specifies the folder for the operating system running Vericut (windows64).
Example: For Vericut 9.7, set to:
C:\Program Files\CGTech\Vericut 9.7\windows64
LSHOST
Purpose: Defines the name of the license server computer.
Example: localhost
CGTECH_SINGLE_PLATFORM (Optional)
Purpose: Specifies if Vericut is running on a single platform.
Example: CGTECH_SINGLE_PLATFORM=YES
CGTECH_BINARY_STL (Optional)
Purpose: set if the user wishes to generate binary STL files instead of ASCII STL files.
Example: CGTECH_BINARY_STL=Yes
CGTECH_CATV_ALL_VISIBLE (Optional)
Purpose: set if the user wishes to ignore hidden state of models in the CATProcess.
Example: CGTECH_CATV_ALL_VISIBLE=Yes
Set up a VDAF icon: CATIA V5 VDAF Interface
To add an icon to the Toolbar
If you wish to have an icon ![]() on a CATIA V5 toolbar, the two icon files must be placed where CATIA V5 expects to find them.
on a CATIA V5 toolbar, the two icon files must be placed where CATIA V5 expects to find them.
The paths depend on where you have CATIA V5 installed, but typically you will find a "small" and "normal" folder under:
"C: Program Files\Dassault Systemes\Bxx\win_b64\resources\graphic\icons".
Place the two versions of the CAT2VDAF icon, both called "I_CATV.bmp", in the appropriate folders.
Adding the CAT2VDAF icon ![]() to a CATIA V5 toolbar is a multi-step process;
to a CATIA V5 toolbar is a multi-step process;
- Get CATIA V5 running.
- Make the Advanced Machining workbench active, either by accessing an existing CATProcess file, or by initializing a new one. One or more of the Manufacturing toolbars are likely to be suitable locations for the CAT2VDAF icon.
- Pick Tools > Macro > Macros from CATIA V5's menus.
- In the Macros dialog, pick Macro Libraries.
- In the Macro Libraries dialog, set the Library Type to Directories.
- Pick Add existing library ... and select the folder containing the CATV.CATScript file (for example "C:\Program Files\CGTech\Vericut x.x.x\Windows\catv5").
- Close the Macro Libraries dialog.
- Close the Macros dialog.
- Pick Tools > Customize ... from CATIA V5's menus.
- In the Customize dialog, bring the Commands tab to the front.
- Select Macros from the left-hand list of Categories.
- Pick CATV.CATScript from the right-hand list of Commands.
- Click on the Show Properties ... button.
- Pick the "..." button to the right of the Icon: label.
- In the Icon Browser dialog you need to step through the pages of icons until you find the one for CAT2VDAF
 . The icons are presented in alphabetic order of their names, which you can see by allowing the mouse cursor to sit over an icon for a brief period. The CAT2VDAF icon will probably be on the twelfth page. Pick it and Close the Icon Browser.
 - Back on the Customize dialog, position the mouse cursor over the name of the macro, CATV.CATScript, in the right-hand list, depress the left mouse button, and drag the cursor to the toolbar where you want the icon to appear. It's counter-intuitive, but you drag the macro name, not the icon! Repeat this step if you want the icon to appear on more than one toolbar.
- Close the Customize dialog.
Microsoft Redistributables: CATIA V5 VDAF Interface
The CATIA V5-to_VDAF Interface may require the installation of Microsoft Redistributables, specifically the Windows C++ run-time libraries. These libraries ensure compatibility and proper functioning of the interface, allowing seamless data transfer between CATIA V5 and VDAF for manufacturing simulation.
Note: A runtime library is a collection of low-level compiler support routines and functions that are used by virtually all programs compiled with GCC (GNU Compiler Collection) and can be downloaded here.
Documentation: CATIA V5 VDAF Interface
The CatiaV5-to-VDAF Interface (CAT2VDAF) exports the CatiaV5 models which represent the VDAF Skin, Structure, Fixture and design points to VDAF.
Accessing the CATIA V5 VDAF Interface
To connect CATIA V5 with VDAF, follow these steps:
1. Run the CAT2VDAF batch file
- Navigate to C:\Program Files\CGTech\Vericut x.x.x\windows64\commands\catv5_2vdaf.bat
- Execute the file to initiate the interface.
2. Alternately, you can use the VDAF icon
- Click on the VDAF icon to launch the interface.
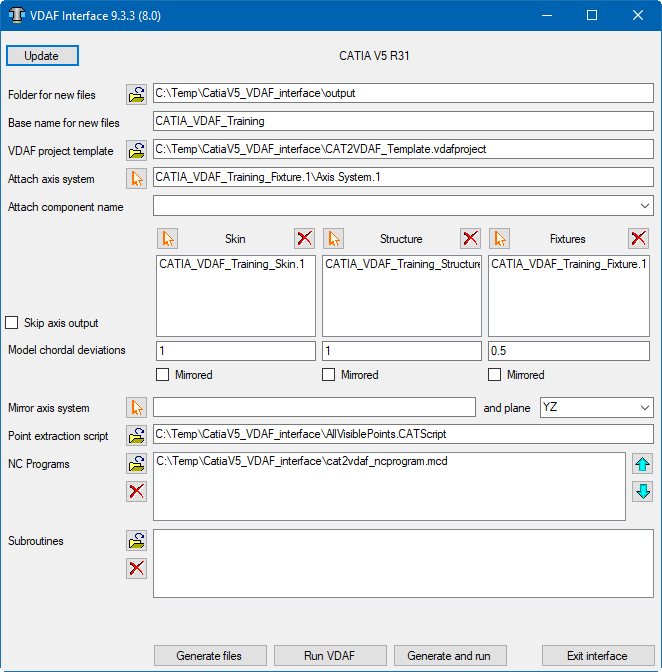
When you trigger CAT2VDAF, you should see a window similar to this:
License Handling
- The interface checks out a license when opened.
- The interface checks in the license when closed.
Update

CATIA can have more than one CATProduct file open at once.
CATV5_2VDAF is not aware when you switch between files in CATIA. This button forces the program to refresh the interface\'s content from the currently active CATProduct. If the active CATIA file is not a CATProduct (it could be a CATProcess or a CATPart for example) the program will display a warning message.
Files

CATV5_2VDAF will generate several files to pass CATIA information to VDAF.
The following can be created:
- Temporary files (with the \".VcTmp\" extension).
- Model files (in STL format with the \".stl\" extension).
- A file of points where holes should be drilled and fasteners located (in XML format, probably with the \".xml\" extension).
All these files will be placed in a single folder. If you have defined the CGTECH_CATV2VDAF environment variable, the folder it references will appear in the first text field of this pair. If not, the location of the CATProduct file will be presented so that you can keep all the related files in one place. In either case you can override the suggested folder, by entering a different location or by browsing  for one.
The names of the created model files depend on the names of the corresponding CATParts. But the temporary files, the file of design points, the final VDAF project, and its log file are all given the same name, which is provided by the second text field of this pair. By default, it will be filled in with the CATProduct name, but you can override it if you wish.
Template

The files generated by CATV5_2VDAF are intended to be "add-ons" for an existing VDAF project that contains much more detail than is present in the CATProduct file. For example, you may have a machine and control fully specified in a project file, and simply wish to place the CATProduct's skin, structure and fixtures on this machine before verifying NC programs.
In this field you can specify a template file for the project. Normally such a file has the extension ".VDAFProject".
If you do not specify a project template, either "init.VDAFProject" or "initm.VDAFProject" will be used, depending on whether CATIA has the unit of length set to "inch" or "millimeter".
Attach

To populate the first of this pair of fields, you should select the axis system from the CATProduct that will be placed on one of the VDAF machine's "Attach" components. To graphically select an axis system, click on the  button, then pick an axis system from a product or part. To exit selection mode without making a choice, use CATIA's "Edit" ► "Undo" option.
Note that you can reverse the selection sequence by picking an axis system first, then clicking the button. The name of the selected axis system will appear in the field.
In the second field of this pair, you can specify the name of the corresponding "attach" component in the VDAF machine. If left blank, the default name "Attach" will be used.
Models
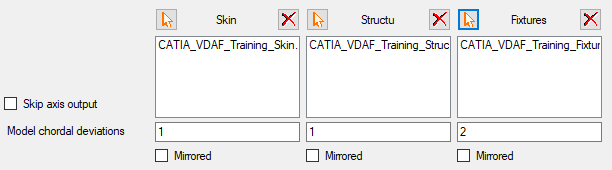
You should specify which of the CATParts in the active CATProduct represent the skin, structure and fixtures. You can graphically select models, by clicking on one of the buttons. Then you can pick a product or part from any level in CATIA's tree, or from the picture of the models. All instance names of all CATParts under the selected branch in the tree will be placed in CATV5_2VDAF's corresponding list.
To exit selection mode without making a choice, use CATIA's "Edit" ► "Undo" option. Note that you can reverse the selection sequence by picking a product or part first, then clicking the button.
If you decide that you don't want all the detailed parts transferred to VDAF, you can remove names from any of the three lists by selecting them and clicking on the appropriate  button. The "Shift" and "Ctrl" keys can be used in the normal way to select multiple names from the list so they can be removed together.
If you decide that you don't want the Coordinate systems from Catia V5 output to VDAF, check Skip axis output
Model Tolerance
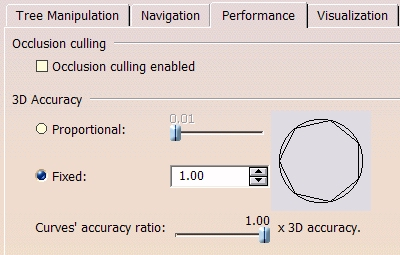
You can specify the chordal deviations used when generating the STL files for each type of model. The values are temporarily inserted into CATIA's "Tools ► Options ► Display ► Performance ► 3D Accuracy ► Fixed" field, and the "Fixed" option is selected. We do not claim to understand CATIA's interpretation of the "Fixed" accuracy value, which appears to be non-dimensional and is limited to lie between 0.01 and 10.
Mirroring

Each set of models, for the skin, structure or fixtures can be individually mirrored through one of the three orthogonal planes defined by a selected coordinate system.
Point extraction script

After CATV5_2VDAF has generated STL models for all the parts you have nominated, and before it triggers VDAF, it will invoke the CATScript specified in this field. A script is expected to extract design points from the active CATProduct and its referenced CATParts, and format their data in an XML file. A sample script is provided which extracts all points that are not "hidden" in CATIA. We encourage customer sites to modify this script, or replace it, to tailor it the needs of individual projects. Note that a well written script can be invoked directly from CATIA, bypassing the need to re-run CATV5_2VDAF if the points have changed but not the models.
NC Programs

You can browse for existing programs that you want to be associated with the project. If you do so, it is important to ensure that the list is in the order of cutting. You can erase programs from the list, or re-arrange them  or
or  .
.
Subroutines

If you have programs that reference subroutines, you can browse to select the existing subroutine files. You can also erase subroutines from the list.
Generate Buttons

When you have provided CAT2VDAF with all the information it needs, you can perform the transfer of data to, and triggering of, VDAF. Click on the Generate files button to create the tool libraries, models and NC programs without triggering VDAF.
Once you have all the files needed, you can fire up VDAF with the Run VDAF button. You can perform both of these steps at once with the Generate and run button. The Exit interface button terminates the program.
Preferences
Preferences File
Also known as 'prefs' file, stores all user specified 'global' settings for interface operation. The settings stored are called 'global' because they are responsible for overall look & feel and operational behavior of the interface. They are not tied to any specific CATIA V5 project. By default, Preferences' file is generated at C:\Users\username\cat2vdaf_user.prefs.
Custom Data
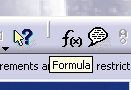
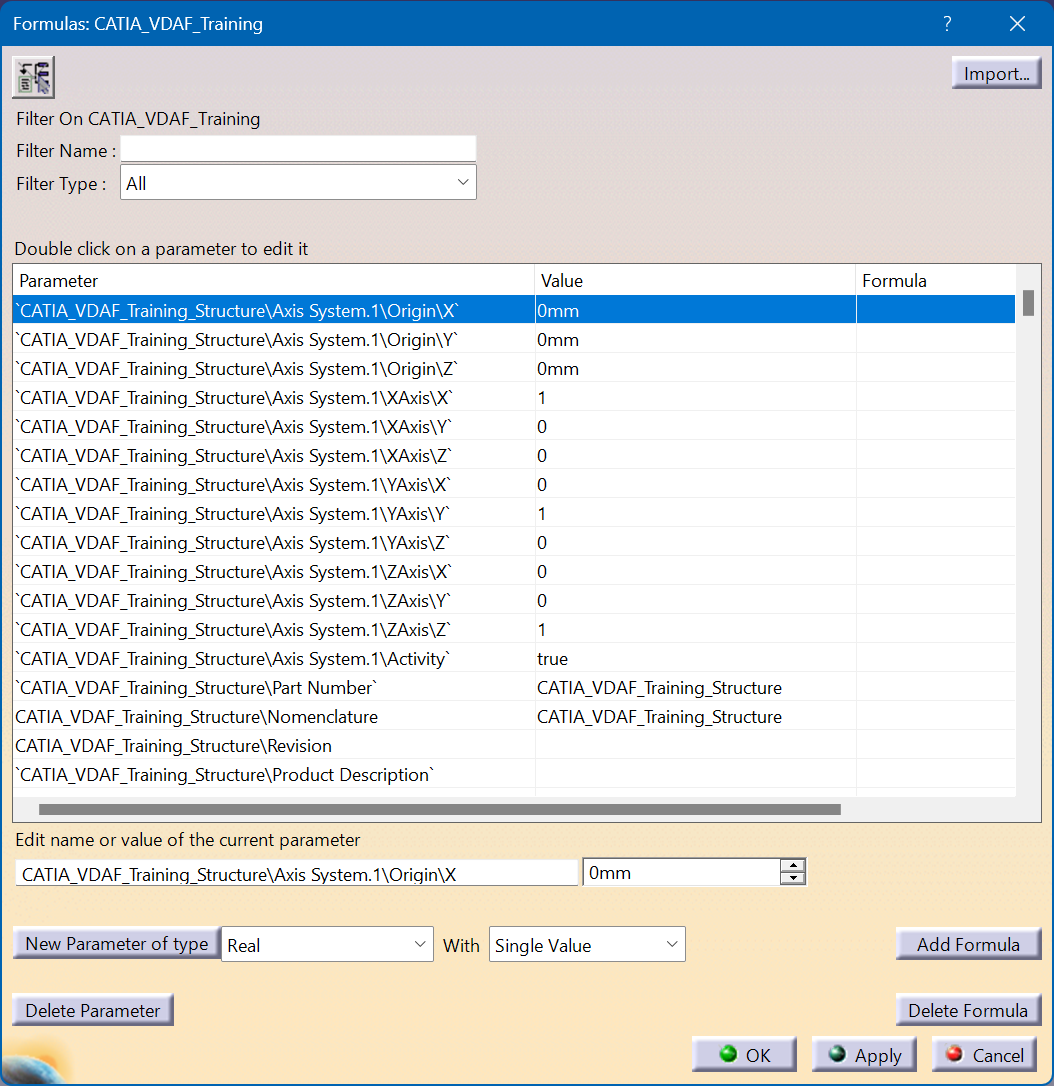
CAT2VDAF stores it fields as parameters within Catia. To access these parameters, make the CATProduct active in the tree and select formula and then select type "vdaf" in the Filter Name