Personalizing the Vericut Reviewer Main Window
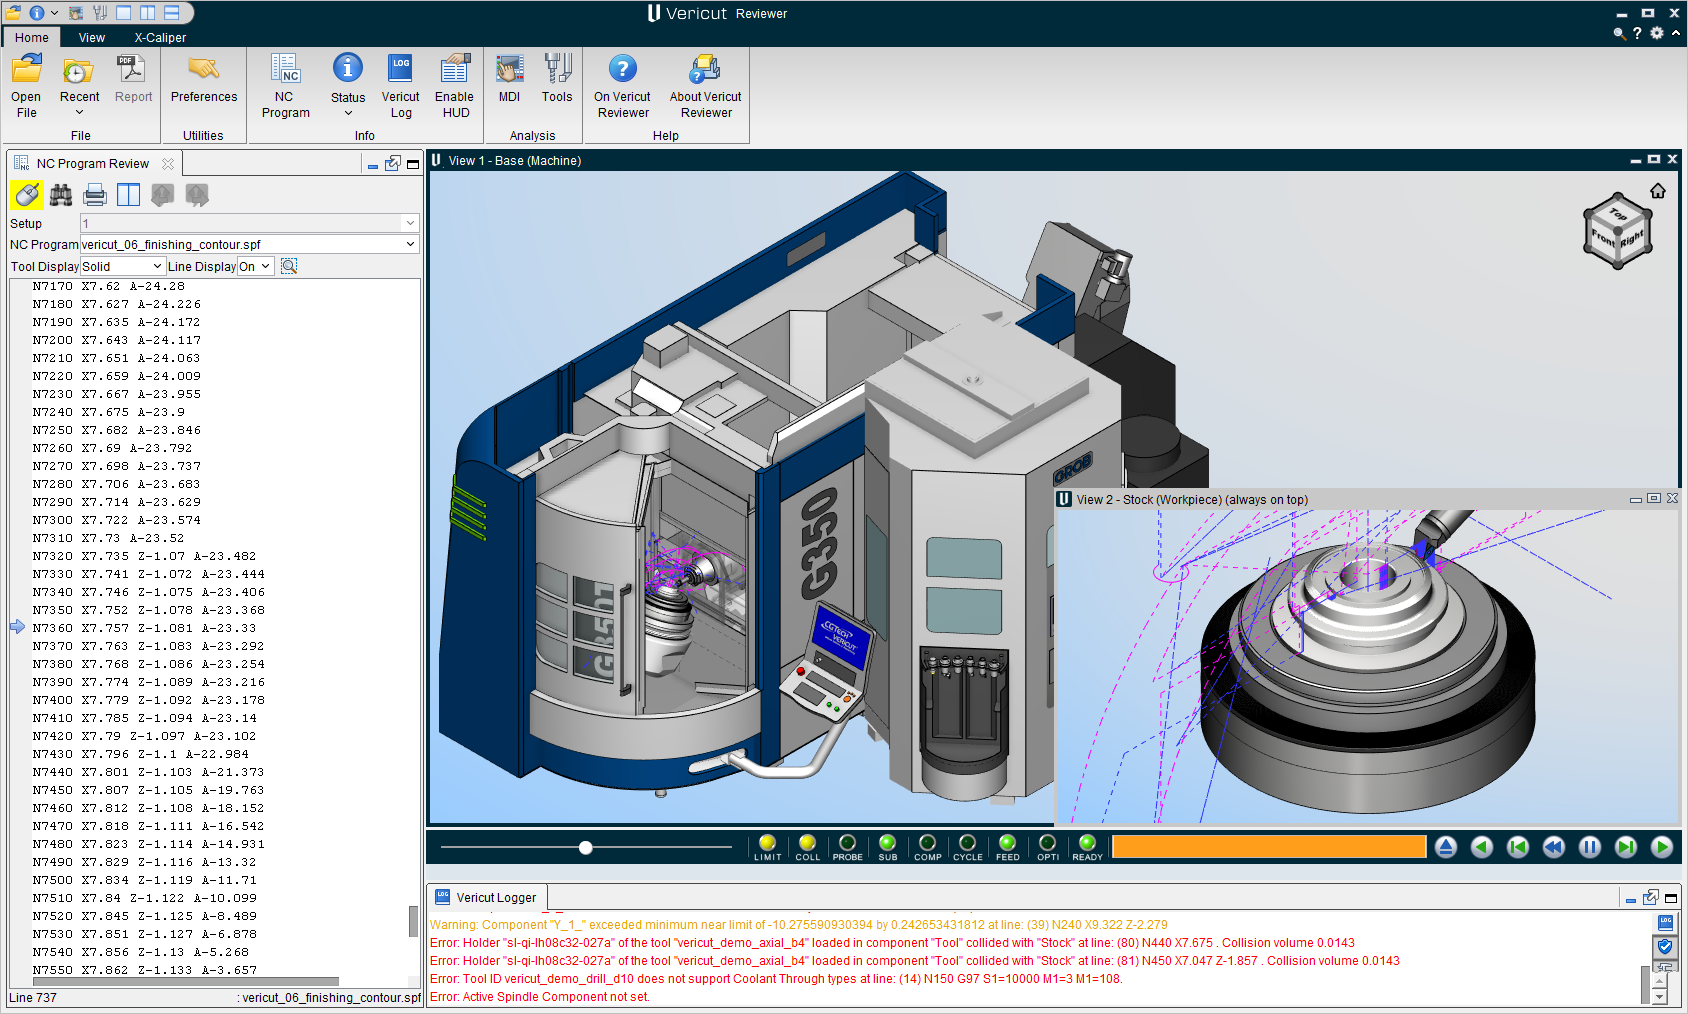
Vericut Reviewer enables you to personalize your workspace to match the process by which you use Vericut Reviewer's many features, as well as incorporating your own personal preferences. Through the use of "dockable" dialog windows, you can set up your Vericut Reviewer workspace as simply or as complex as you choose. Each of these windows can be docked inside the Vericut Reviewer main window, or un-docked to be displayed as a stand-alone window. By docking or undocking windows, you can tailor the Vericut Reviewer workspace to meet your specific needs. The "Simple Vericut Reviewer Workspace" illustrates the most basic workspace.
📝 NOTE: The following discussion uses Vericut Simulation images but the concepts are the same for Vericut Composite Simulation.
Simple Vericut Reviewer Workspace:
The "Complex Vericut Reviewer Workspace" would have all of the available "dockable" windows docked to the Vericut Reviewer main window. While it appears cluttered, and is not likely an efficient workspace, the intent is to show the flexibility that you have for setting up your workspace. The optimum workspace layout will likely be somewhere between these two extremes. The main point is that you decide the most effective workspace layout based on how you use Vericut Reviewer and how you prefer to interact with its features.
Dockable Panels
The following summarizes the dockable panels that can be docked inside Vericut Reviewer’s main desktop:
| Dockable Panel | Location | Docking Positions |
|---|---|---|
| Toolbar | Vericut Reviewer main window | Left, Right , Top, Bottom, Standalone |
| Animation Controls | Vericut Reviewer main window | Top, Bottom, Standalone |
| Vericut Logger | Vericut Reviewer main window | Left, Right, Top, Bottom, Stand-alone |
| NC Program Review | Info tab > NC Program | Left, Right , Top, Bottom, Standalone |
| Status panel | Info tab > Status | Left, Right, Standalone |
📝 NOTE: When any of the above "panels" is docked, make sure that you click in the window so that it becomes the "active" window before using F1 to get help specific to the window. Otherwise F1 will go to the Vericut Help Library.
Single Panels
Docked Panels
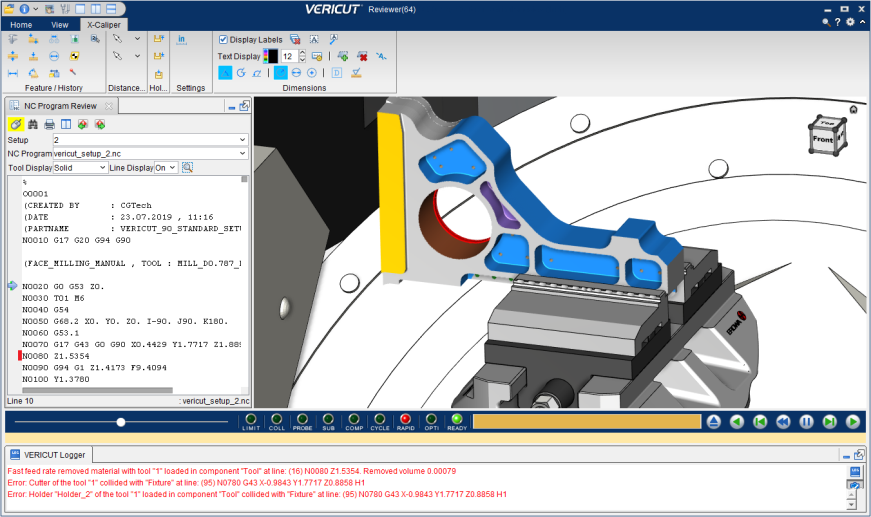
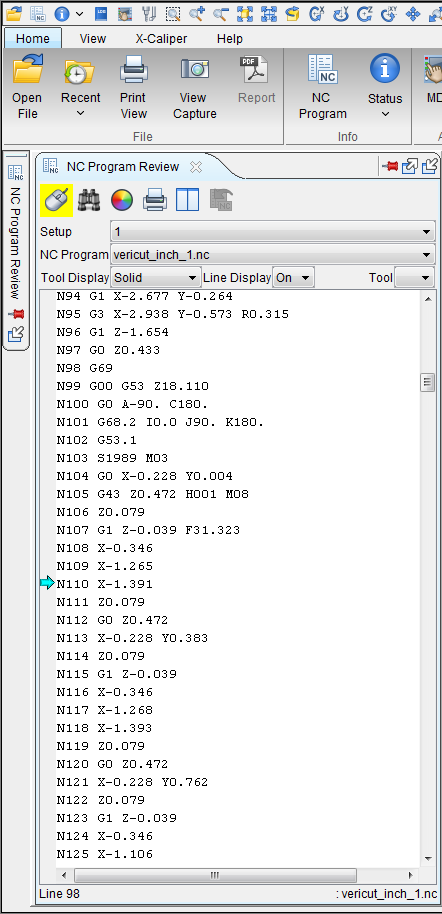
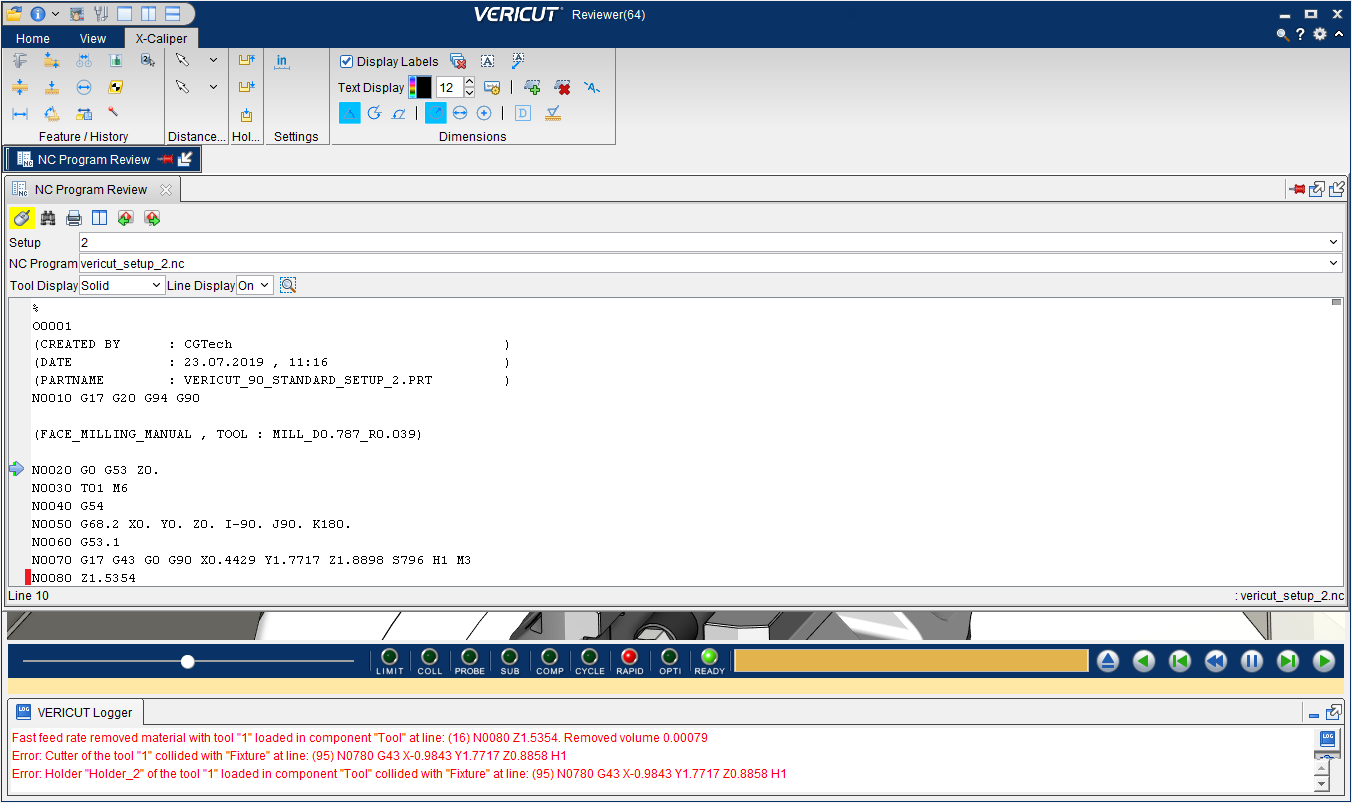
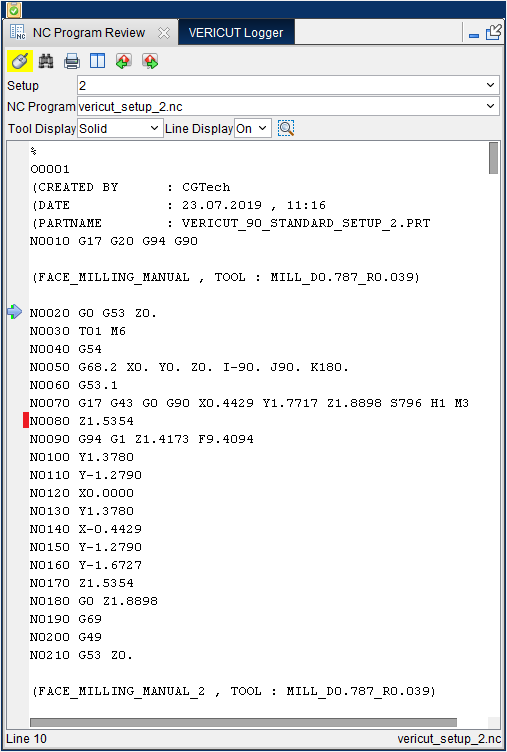
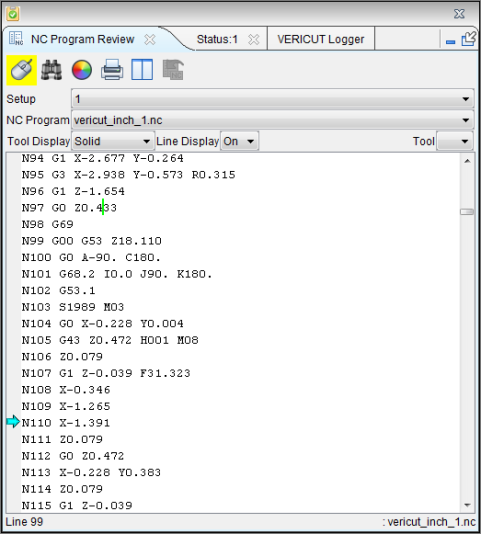
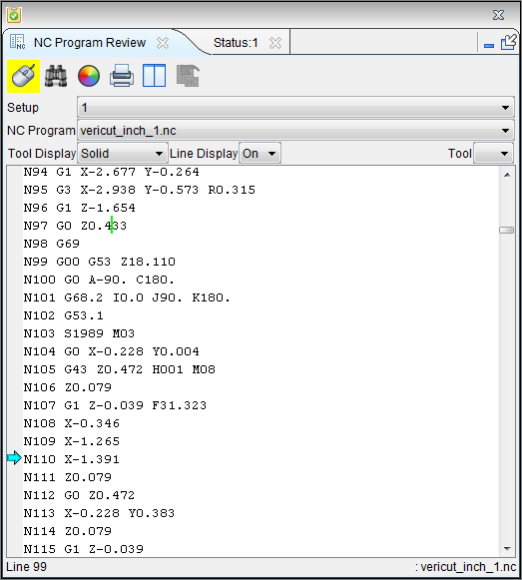
In general, “docked” panels, like the NC Program Review panel, will have a tab that looks like the following picture.

Most “docked” panels have the three icons described below.
The  (Close) icon located at the end of each tab enables you to close the “docked” panel. The next time that you access the panel from the Vericut main menu ribbon, it will be displayed as a “docked” panel.
The ![]() (Overlay) icon converts a “docked” panel to an “overlay” panel at the previous “overlay” panel location.
(Overlay) icon converts a “docked” panel to an “overlay” panel at the previous “overlay” panel location.
The ![]() (Floating) icon converts a “docked” panel to a “floating” panel at the previous “floating” panel location.
(Floating) icon converts a “docked” panel to a “floating” panel at the previous “floating” panel location.
The exceptions to the “most docked panels” statement above are:
-
The Vericut Logger panel cannot be closed so therefore does not have a
(Close) icon at the end of the tab. -
The Animation Control panel cannot be closed or displayed as an “overlay” panel. You can only drag it to another “docked” location or drag it outside of the Vericut main window so it becomes a “floating” panel.
- The Toolbar cannot be displayed as an “overlay” panel. You can only drag it to another “docked” location or drag it outside of the Vericut main window so it becomes a “floating” panel. You can close the Toolbar using the
 (Close) icon. The Toolbar does not size automatically.
💡 Tip: Holding the cursor over any of the icons will display a tip showing what the icon is used for.
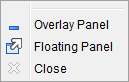
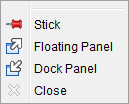
Right-click on a tab in the “floating” panel to display the following menu. Each menu item provides the same functionality described above.
Creating a Docked panel from a Floating panel
- Using the Vericut main menu ribbon, open a dockable panel. In this case it is the NC Program Review panel.
-
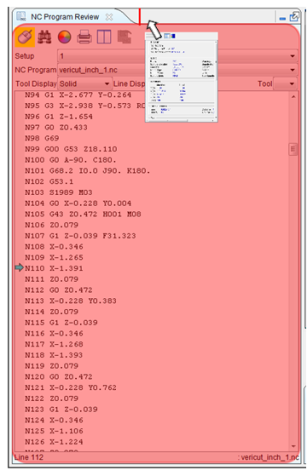
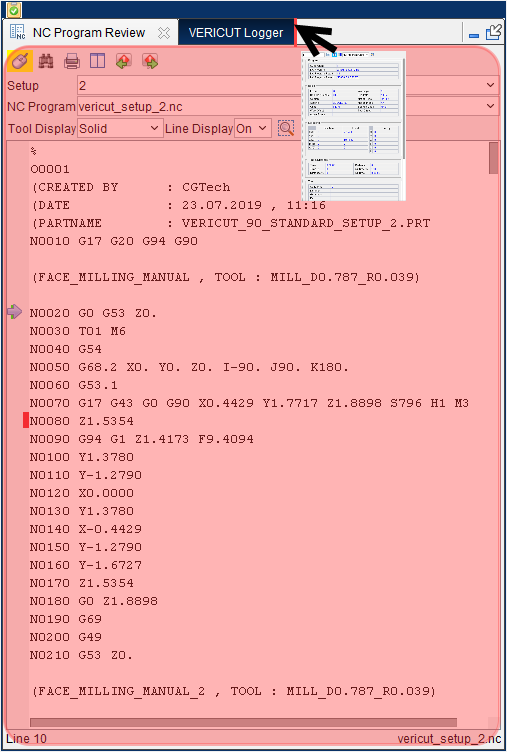
Click on the “floating” panel’s tab and start dragging the panel toward the location where you want the panel “docked”. You will see a small panel inside the “floating” panel as shown in the picture below.
-
Continue moving the cursor and small panel to the location where you want to dock the panel.
📝 NOTE: As you move the cursor and small panel around the Vericut main window, you will find many dockable locations represented by red rectangles in various sizes and orientations. -
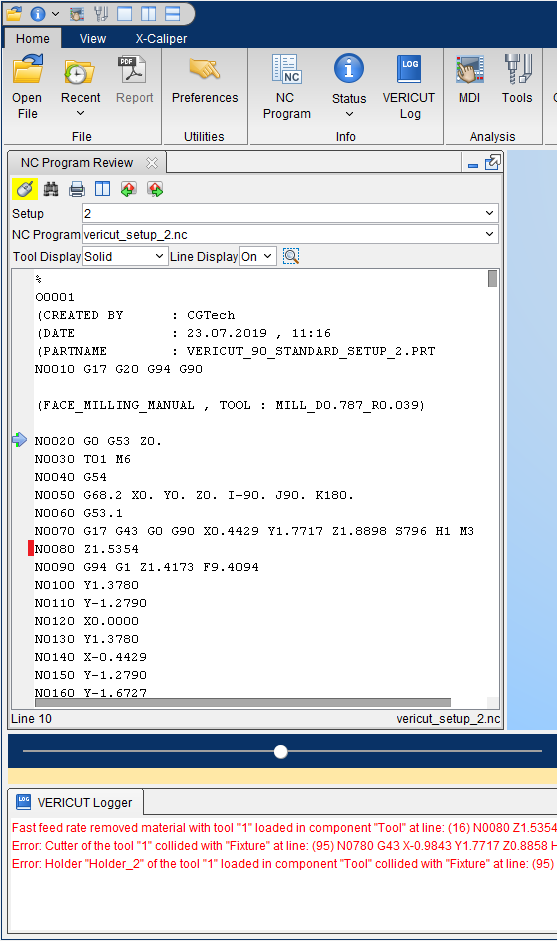
Releasing the mouse button will dock the floating panel in the location of the red rectangle as shown in the picture below.
Creating a Docked panel from an Overlay panel
-
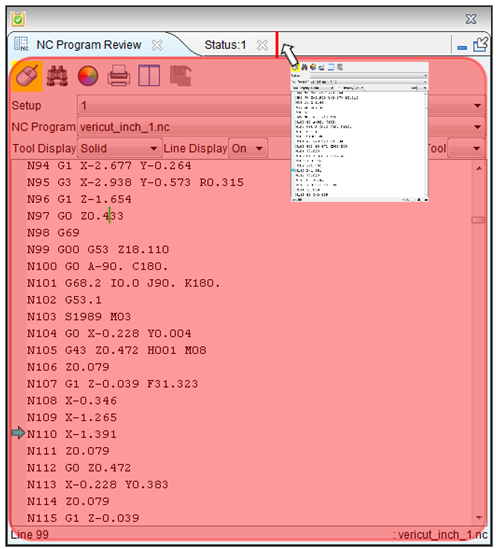
Start with an Overlay panel, in this case the NC Program Review panel, as shown in the picture below.
-
Click on the
 (Docked) icon, located at the bottom of the Overlay tag to change the Overlay Panel to a Docked Panel at the previous docked location as shown in the picture below.
📝 NOTE: If you want the panel docked in a different location, click on the panel’s tab and drag the it outside of the main Vericut window so that it becomes a “floating panel”, then use the procedure described in the Creating a Docked panel from a Floating panel section above to dock it in a different location.
Floating Panels
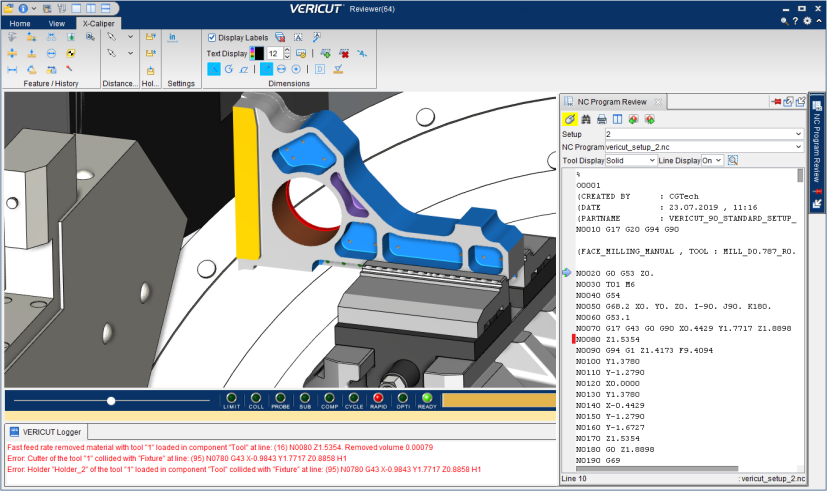
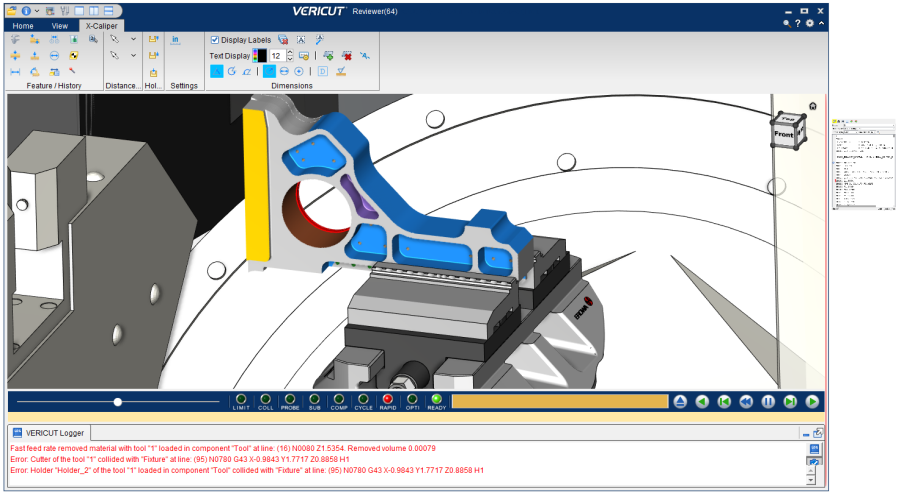
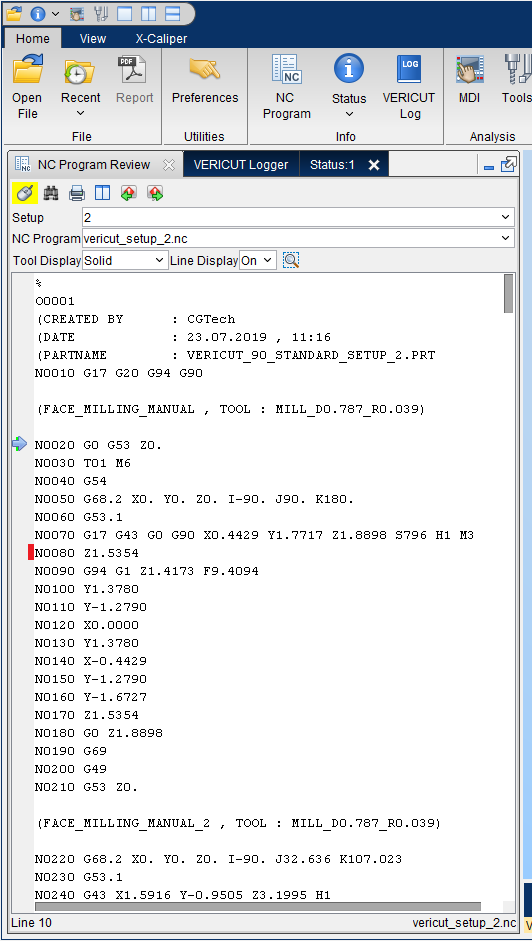
“Floating” panels, like the NC Program Review panel shown below, will have a tab that looks like the following picture.

“Floating” panels have the three icons described below.
The (Close) icon, located at the end of each tab enables you to close the “floating” panel. The next time that you access the panel from the Vericut main menu ribbon, it will be displayed as a “floating” panel.
The ![]() (Overlay) icon converts a “floating” panel to an “overlay” panel at the previous “overlay” panel location.
(Overlay) icon converts a “floating” panel to an “overlay” panel at the previous “overlay” panel location.
The ![]() (Docked) icon converts a “floating” panel to a “docked” panel at the previous “floating” panel location.
(Docked) icon converts a “floating” panel to a “docked” panel at the previous “floating” panel location.
💡 Tip: Holding the cursor over any of the icons will display a tip showing what the icon is used for.
Right-click on a tab in a “floating” panel to display the following menu. Each menu item provides the same functionality described above.
Creating a Floating panel from a Docked panel
To convert a “docked” panel into a “floating” panel, click on the tab in the “docked” panel and drag the panel outside of the Vericut main window.
Creating a Floating panel from an Overlay panel
To convert an “overlay” panel into a “floating” panel, click on the “overlay” tag and drag the panel outside of the Vericut main window.
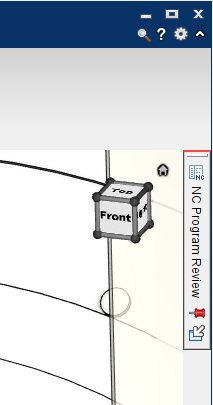
Overlay Panels
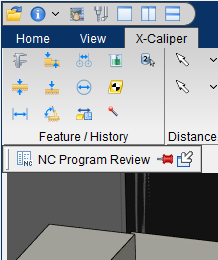
“Overlay” panels, like the NC Program Review panel shown below, will have a tag that looks like the following pictures.
| Image | Explanation |
|---|---|
 |
The tag will be displayed vertically when the when the panel is in an “overlay” state on the right or left side of the Vericut main window. Clicking on the tag will display the NC Program Review panel. Clicking on it again will return the NC Program Review panel to the “overlay” state. See the example below. |
 __________________________________ __________________________________ |
The tag will be displayed horizontally when the when the panel is in an “overlay” state on the top or bottom of the Vericut main window. Clicking on the tag will display the NC Program Review panel. Clicking on it again will return the NC Program Review panel to the “overlay” state. See the example below. |
“Overlay” tags have the three icons described below.
The push pin icon changes the behavior of an “overlay” panel. Click on the push pin to change between the two modes.
When the  icon is displayed, an open “overlay” panel returns to the “overlay” state when the focus is lost (click on the “overlay” tag or anywhere outside the open “overlay” panel).
When the  icon is displayed, an open “overlay” panel returns to the “overlay” state only when you click on the “overlay” tag.
The ![]() (Docked) icon, located on the right side of a horizontal tag or the bottom of a vertical tag, changes the “overlay” panel to a “docked” panel at the previous “docked” panel location.
(Docked) icon, located on the right side of a horizontal tag or the bottom of a vertical tag, changes the “overlay” panel to a “docked” panel at the previous “docked” panel location.
💡 Tip: Holding the cursor over any of the icons will display a tip showing what the icon is used for.
Right-click on an “overlay” tag to display one of the following menus depending on the current state of the push pin icon. Each menu item provides the same functionality as described above.
 |
 |
|---|---|
Vertical Example
| Overlay | Open |
|---|---|
 |
 |
Horizontal Example
| Overlay | Open |
|---|---|
 |
 |
Open “overlay” panels, like the NC Program Review panel shown below, will have a tab that looks like the following picture.

Open “overlay” panels have the following icons described below.
The (Close) icon, located at the end of each tab enables you to close the “overlay” panel and remove the “overlay” tag. The next time that you access the panel from the Vericut main menu ribbon, it will be displayed as an “overlay” panel.
The push pin icon changes the behavior of the “overlay” panel. Click on the push pin to change between the two modes.
When the icon is displayed, an open “overlay” panel returns to the “overlay” state when the focus is lost (click on the “overlay” tag or anywhere outside the open “overlay” panel).
When the icon is displayed, an open “overlay” panel returns to the “overlay” state only when you click on the “overlay” tag.
The ![]() (Floating) icon converts an “overlay” panel to a “floating” panel at the previous “floating” panel location. You can also click on the open “overlay” panel’s tab and drag it outside if the main Vericut window to change it to a “floating” panel.
(Floating) icon converts an “overlay” panel to a “floating” panel at the previous “floating” panel location. You can also click on the open “overlay” panel’s tab and drag it outside if the main Vericut window to change it to a “floating” panel.
The ![]() (Docked) icon converts an “overlay” panel to a “docked” panel at the previous “docked” panel location.
(Docked) icon converts an “overlay” panel to a “docked” panel at the previous “docked” panel location.
💡 Tip: Holding the cursor over any of the icons will display a tip showing what the icon is used for.
Right-click on a tab in an open “overlay” panel to display one of the following menus depending on the current state of the push pin icon. Each menu item provides the same functionality described above.
|
|
|---|---|
Creating an Overlay panel from a Floating panel
-
Using the Vericut main menu ribbon, open a dockable panel. In this case it is the NC Program Review panel.
-
Click on the “floating” panel’s tab and start dragging the panel toward the location where you want the panel “docked”. You will see a small panel inside the “floating” panel as shown in the picture below.
-
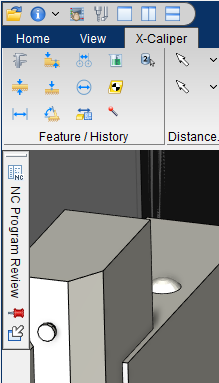
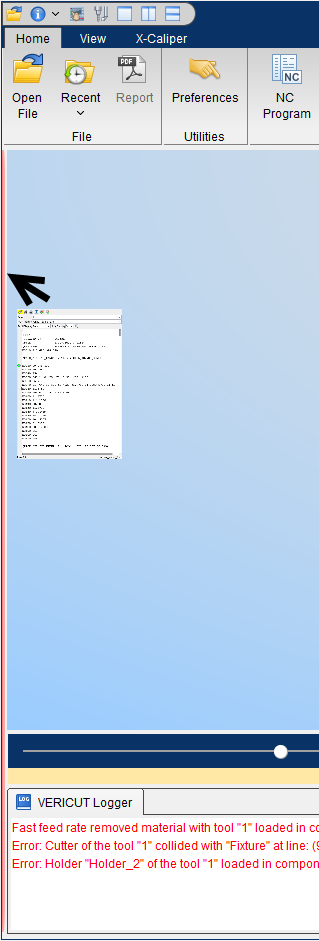
Continue moving the cursor and small panel to the location where you want to overlay the panel. When the cursor gets on the edge of the Vericut main window, a very narrow red rectangle, similar to the one shown in the picture below, will display where the “overlay” tag will be placed.
You can locate other overlay locations, indicated by the narrow rectangle, by placing the cursor on the left, bottom or right edges of the Vericut main window. The overlay location at the top of the Vericut main window can be found by placing the cursor on the very bottom of the Vericut main Menu ribbon.
-
Releasing the mouse button will display the “overlay” tag in the location of the red rectangle as shown in the picture below.
Creating an Overlay panel from a Docked panel
-
Start with a “docked” panel, in this case the NC Program Review panel, as shown in the picture below.
-
Click on the
 (Overlay) icon in the top right corner of the “docked” panel to convert the “docked” panel to an “overlay” panel at the previous “overlay” panel location. The “overlay” tag will be displayed as shown in the picture below.
📝 NOTE: If you want the “overlay” tag in a different overlay location you can click on the “overlay” tag and drag it to the desired overlay location using the narrow red rectangle, described in the Creating an Overlay panel from a Floating panel section above.
Tabbed Panels
Any “dockable” panel can be configured with multiple tabs. Tabbed panels can be displayed in the same three states as any other “dockable” panel. The following are some examples.
Docked Panel with Multiple Tabbed Panels
The following picture shows a multi-tab “docked” panel on the left side of the Vericut main window. The tabbed panel contains the Project Tree panel, the NC Program Review panel and the Status panel. Click on a tab to display the entire panel.
Create a Docked Panel with Multiple Tabbed Panels
-
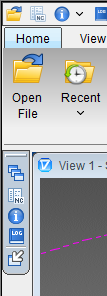
Open the first “floating” panel, in this case the NC Program Review panel (Home tab > NC Program).
-
Open the second “floating” panel, in this case the Status panel (Home tab > Status).
-
Click on the tab in the “floating” Status panel and then drag it into the “floating” NC Program Review panel. The “floating” panel should now look like the picture below.
-
Click in the non-tabbed section of “floating” panel’s header (indicated by the red box in the picture below) and start dragging the panel toward the location where you want the panel “docked”. You will see a small panel inside the “floating” panel as shown in the picture below.
-
Continue moving the cursor and small panel to the location where you want to dock the panel. When you get close to a “dockable” location, a red rectangle similar to the one shown in the picture below, will display where the panel will be docked.
-
Releasing the mouse button will dock the “floating” panel in the location of the red rectangle as shown in the picture below.
Using Docked Tabbed Panels
To change the order of the tabs in a tabbed panel, click on the tab and drag it right or left to the desired position.
To remove a tab from the tabbed panel, click on the  (Close) icon located at the end of the tab.
To convert a tabbed “docked” panel into a tabbed “floating” panel, click in the non-tabbed section of “docked” panel’s header (described above in Step 4) and drag the panel outside of the Vericut main window.
The all other behavior for a tabbed “docked” panel is the same as described above for Single Panels.
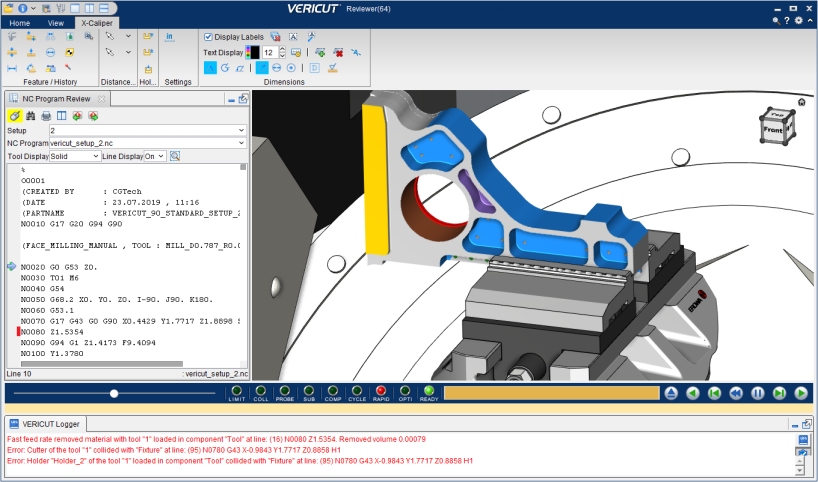
Floating Panel with Multiple Tabbed Panels
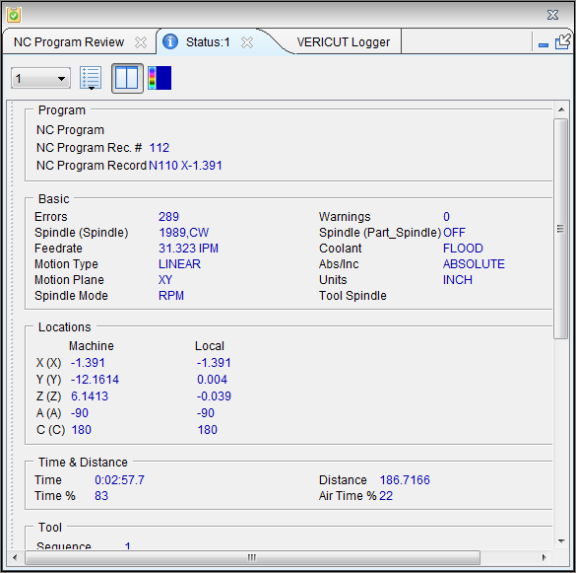
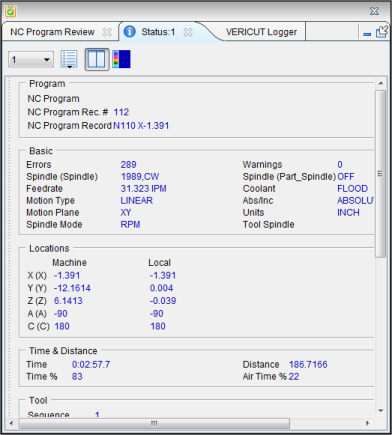
The following picture shows a multi-tab “floating” panel. The tabbed panel contains the NC Program Review, Status, and Vericut Logger panels. Click on a tab to display the entire panel. This configuration would replace the G-Code Debug window of previous releases.
Create a Floating Panel with Multiple Tabbed Panels
This example will re-create the G-Code Debugging window of previous releases.
-
Open the first “floating” panel, in this case the NC Program Review panel (Home tab > NC Program).
-
Open the second “floating” panel, in this case the Status panel (Home tab > Status).
- Click on the Status tab and drag it into the “floating” NC Program Review panel.
- Open the third “floating” panel, in this case the Vericut Logger panel.
- Click on the Vericut Logger tab and drag it into the “floating” NC Program Review panel.
Using Floating Tabbed Panels
To close a tabbed “floating panel, click on the  (Close) icon.
To re-open a tabbed “floating” panel, open any one of the panels contained in the tabbed panel using the Vericut main menu ribbon. The tabbed panel will display with the selected panel open.
For example using the tabbed “floating” panel created above, selecting Status in the Home tab will display the tabbed window with the Status panel displayed as shown in the picture below.
To change the order of the tabs in a tabbed panel, click on the tab and drag it right or left to the desired position.
To remove a tab from a tabbed panel, click on the (Close) icon located at the end of the tab.
The all other behavior for tabbed “floating” panels is the same as described above for Single Panels.
Overlay Panel with Multiple Tabbed Panels
The following picture shows a multi-tab “overlay” panel on the left side of the Vericut main window. The tabbed panel contains the Project Tree panel, The NC Program Review panel and the Status panel. Click on a tab to display the entire panel.
Creating an Overlay panel with Multiple Tabbed Panels
- Open the first “floating” panel, in this case the NC Program Review panel (Home tab > NC Program).
- Open the second “floating” panel, in this case the Status panel (Home tab > Status).
- Click on the tab in the “floating” Status panel and then drag it into the “floating” NC Program Review panel. The “floating” panel should now look like the picture below.
-
Click in the non-tabbed section of “floating” panel’s header (indicated by the red box in the picture below) and start dragging the panel toward the location where you want the “overlay” tag. You will see a small panel inside the “floating” panel as shown in the picture below.
-
Continue moving the cursor and small panel to the location where you want to overlay the panel. When the cursor gets on the edge of the Vericut main window, a very narrow red rectangle, similar to the one shown in the picture below, will display where the “overlay” tag will be placed.
-
Releasing the mouse button will display the “overlay” tag in the location of the red rectangle as shown in the picture below.
Using Tabbed Overlay Panels
“Overlay” tags for tabbed panels will have a  icon indicating that it is a tabbed “overlay” panel and a
 ![]() (Docked) icon. In addition it will have an icon for each tab in the tabbed panel.
(Docked) icon. In addition it will have an icon for each tab in the tabbed panel.
Click on the icon to open the tabbed panel with the previously displayed tab displayed.
Click on one of the icons representing the tabs contained in the tabbed panel, for example  (NC Program), and the tabbed panel will open with the selected tab displayed.
To change the order of the tabs in a tabbed “overlay” panel, click on the tab and drag it right or left to the desired position.
To remove a tab from a tabbed “overlay” panel, click on the (Close) icon located at the end of the tab.
To convert a tabbed “overlay” panel into a tabbed “floating” panel, click in the non-tabbed section of the “docked” panel’s header (described above in Step 4) and drag the panel outside of the Vericut main window.
The all other behavior for a tabbed “overlay” panel is the same as described above for Single Panels.
Final Notes about Tabbed Panels
-
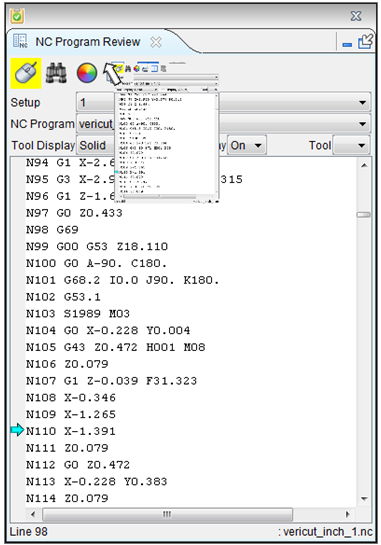
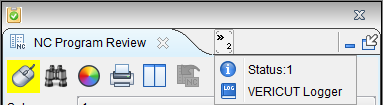
When there is not enough room for all of the tabs to be displayed, an icon like the one shown in the red box in the picture below will display in the tabbed header indicating that not all of the tabs are displayed. The number indicates the number of tabs that are not displayed, in this example 2.

Click on the icon to display a menu showing which tabs are not displayed, as shown in the picture below.
Click on a menu item to display the selected tab in the tabbed panel. In the following picture the Vericut Logger option was selected.

-
When there is not enough room for all of the tabs to be displayed and not enough room to display the icons on the right end of the tabbed header, an additional icon like the one shown in the red box in the picture below will display at the end of the tabbed header indicating that the icons are not displayed.
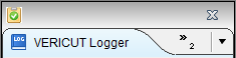
Click on the icon to display a menu with the missing icon options as shown in the picture below.
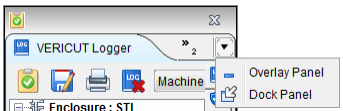
Click on one of the menu options to execute the selected action.