Control Advanced Options (Advanced Control Options window)
Location:
Machine/Control tab >  (Control Advanced Options)
Toolbar short cut: ![]()
The Control Advanced Options command button opens the Advanced Control Options window enabling you to configure advanced NC control options, such as: specify subroutines available in the NC control, perform actions at key processing events (e.g. start of tool path processing, start processing a block, etc.), substitute text strings, and more.
Files tab — The features on this tab specify file to be used in controls.
Subroutines tab — The features on this tab specify names of external files containing subroutines accessible by the NC control.
Substitute tab — The features on this tab maintain text strings that are substituted when specific text in the tool path file is encountered.
Control Notes tab — The features on this tab enable you to write notes about NC Programs.
CME/API tab — Features on this tab enable you to specify a custom CME file containing custom macros that assist the NC control with processing machine code data.
OK — Saves additions/modifications and dismisses the Advanced Control Options window.
Apply — Saves additions/modifications and leaves the Advanced Control Options window open.
Cancel — Closes the Advanced Control Options window without saving any additions/modifications.
To learn more about how Vericut processes G-Code data, see "About Building NC Controls", in the Building NC Controls section of Vericut Help.
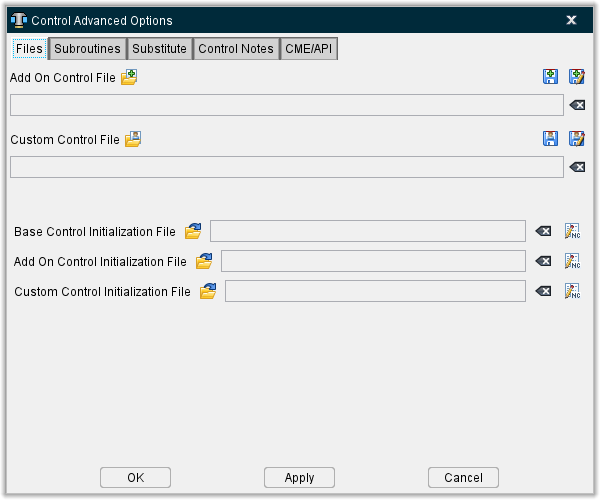
Advanced Control Options, Files tab
Location:
Machine/Control tab >  (Control Advanced Options)
Toolbar short cut: ![]()
The features on the Files tab enable you to specify the names of external files containing control files.
Add On Control File — Enables you to select desired Add On control files. Use the open folder icon ( ) to load a specified Add On control file. Use the save or save as icons (
 ) to store the control file. Use the clear icon (
![]() ) to remove the selected control file from the field.
) to remove the selected control file from the field.
Custom Control File — Enables you to select desired Custom control files. Use the open folder icon ( ) to load a specified Custom control file. Use the save or save as icons (
 ) to store the control file. Use the clear icon (
![]() ) to remove the selected control file from the field.
) to remove the selected control file from the field.
Base Control Initialization Files — Use this field to set and edit additional files that will affect initialization of Base Control files.
Add On Control Initialization Files — Use this field to set and edit additional files that will affect initialization of Add On Control files.
Custom Control Initialization Files — Use this field to set and edit additional files that will affect initialization of Custom Control files.
Control files will be initialized in the following order:
-
Base Control Init file
-
Add Control Init file
-
Custom Control Init file
-
Machine Init file
-
Project Init file
OK — Saves all changes and closes the window.
Apply — Enacts changes without saving them. Window remains open.
Cancel — Closes the window without saving any changes.
Advanced Control Options, Subroutines tab
Location:
Machine/Control tab >  (Control Advanced Options)
Toolbar short cut: ![]()
The features on the Subroutines tab enable you to specify the names of external files containing subroutines accessible by the NC control.
Control list — This column lists which control type the file name is associated with.
File Names list — List of external files containing subs accessible to Vericut.
↘️ Shortcut: Right-click in the File Names list area to display a pop-up window with the following features:

-
Add — Opens the Control Subroutine Files file selection window enabling you to add external subroutine files to the File Names list.
-
Replace — Opens the Control Subroutine Files file selection window enabling you to replace the highlighted subroutine file in the File Names list with another.
-
Delete — Deletes the highlighted subroutine file from the File Names list.
-
Edit — Displays the of the highlighted subroutine file in a text editing window. Standard text editing features are provided, such as: copy/cut, paste, search, etc. For more information on using the editing features see Utilities tab > Text File.
Add — Opens the Control Subroutine Files file selection window enabling you to add external subroutine files to the File Names list. (Same as Add in the pop-up window described above).
Replace — Opens the Control Subroutine Files file selection window enabling you to replace the highlighted subroutine file in the File Names list with another. (Same as Replace in the pop-up window described above).
Delete — Deletes the highlighted subroutine file from the File Names list. (same as Delete in the pop-up window described above)
Delete All — Deletes all subroutines files from the File Names list.
See Using the Control Subroutine Files File Selection Window section of Vericut Help for additional information.
See Add, Modify, or Delete Control Subroutines, in the Using the Advanced Control Options section of Vericut Help for additional information.
Also see About Simulating Subroutines, in the Building NC Controls section of Vericut Help for general information about simulating subroutines.
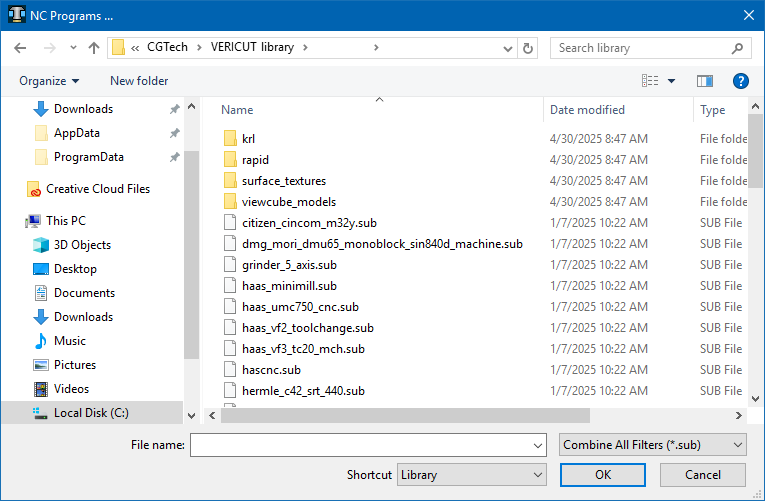
Using the Control Subroutine Files File Selection Window
-
Select the folder in the folder tree on the left side of the window containing the control subroutine file(s) that you want to open.
You can also select the folder from the Shortcut pull-down list, located above the folder tree, if it is found there. -
Once you select the folder in the folder tree, the files in that folder are displayed in the center section of the file selection window. Use the Filter feature to specify the type of files that you want displayed.
-
Select one, or more, files that you want to add to the current Setup from those displayed in the center section of the file selection window so that they become highlighted.
Use the <Shift> key to select a range of files. Select the first file in the range, and then hold down thekey while selecting the last file in the range.
Press and hold the <Control> key while selecting multiple individual files. -
Click on the OK at the bottom of the window to add all of the files in the Current Control Subroutine Files list to the File Names list in the Advanced Control Options window: Subroutines tab and close the file selection window.
- You can click on Cancel at the bottom of the window to close the file selection window without making any control subroutine file changes.
Also see Add, Modify, or Delete Control Subroutine Files section of Vericut Help for additional information.
Advanced Control Options, Substitute tab
Location:
Machine/Control tab  (Control Advanced Options)
Toolbar short cut: ![]()
The features on the Substitute tab enable you to maintain text strings that are substituted when specific text in the NC program file is encountered. Using substitutions lets you alter how Vericut "sees" data in a block without editing the G-Code NC program file. Substitutions occur at the beginning of processing each G-Code data block, prior to parsing block words and values into "tokens". Substitutions in the list are applied in listed order.
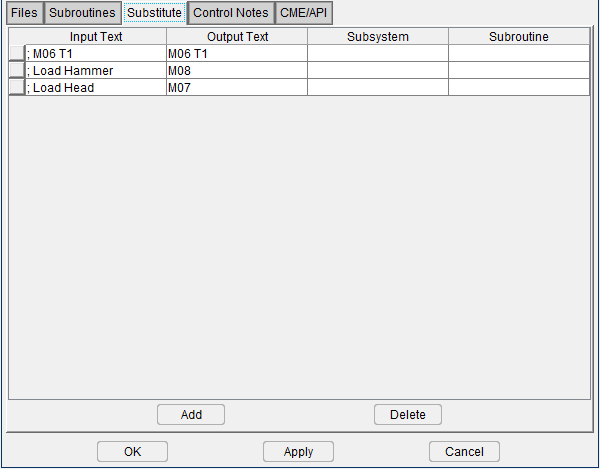
Substitution (Input/Output Text) list — Lists text string substitutions that will occur when specified input text is encountered.
Input Text / Output Text — Specifies an input text string to substitute, and the output text that Vericut will use in its place.
Source — A noneditable column to show where the substitute was created from. Cells in this column will either say MCD, User, or Define.
-
MCD – the substitute was created in an MCD file
-
User – the substitute was created using the GUI
-
Define – the substitute was created using the Siemens Define
Subsystem / Subroutine — If the substitution was defined in the main program or subroutine, then these columns will be filled in. In this case, the substitution will only be applied if in the specified Subsystem/Subroutine. These substitutions also require the character before and after the input text to not be an alphabetic character or an underscore.
📝 NOTE: These fields are ignored if entered from the GUI.
📝 NOTE: Substitution input/output text is case sensitive.
↘️ Shortcut: You can right-click in the Substitution (Input/Output Text) list to display a menu containing the following options.

These provide the same functionality described below.
Add — Adds a new substitution record, after the highlighted record, to the list.
Delete — Deletes the selected substitution record from the list.
See Add, Modify, or Delete Text Substitutions, in the Using the Advanced Control Options section of Vericut Help for additional information.
Advanced Control Options, Control Notes
Location:
Machine/Control tab  (Control Advanced Options)
Toolbar short cut: ![]()
Features on this tab enable you to create and edit notes for various control types. The vertical area of the notes can be resized by clicking the area between Message and Comment and dragging in your desired direction.
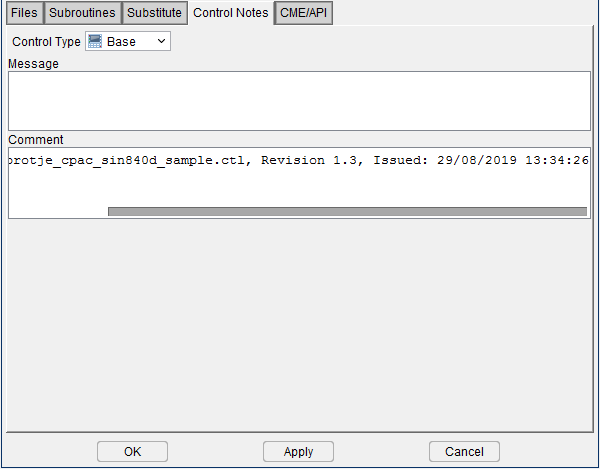
Control Type — Select between Base, Add On, and Custom Control types.
Message — Use field to enter in a message to generate when this control is used.
Comment — Use field to leave information that describes whichever aspects of the control you wish.
Adding "Control Notes" to the NC Control
Use the procedure described below to add notes to the NC Control.
To add notes in the control:
- Click on Control Advanced Options in the Toolbar or click on Machine/Control tab > Control Advanced Options in the Vericut menu ribbon to display the Advanced Control Settings window.
-
Click on the Control Notes tab.
The features on the Control Notes tab enable you to add Message Notes and Comment Notes to the control file.
Message Notes are saved in the header of the control file and are displayed in the Vericut message area (Logger) when the control file is loaded.
Comment Notes are saved in the header of the control file but do not display in the Vericut Logger. -
Add a note by typing the desired text, or edit the text of existing notes, in the appropriate text field.
- Press Apply to accept the note and leave the Control Settings window open for additional work or OK to accept the note and close the Control Settings window.
- Save the Control file by clicking on
 (Save Control) or
  (Save Control As) in the Toolbar or click on Machine/Control tab > Save Control (or Save As) in the Vericut menu ribbon, to save the settings as part of the "current" NC control configuration.
Advanced Control Options, CME/API tab
Location:
Machine/Control tab  (Control Advanced Options)
Toolbar short cut: ![]()
Features on the CME/API tab enable you to specify a custom CME file, or Vericut Macro Executable file containing custom macros that assist the NC control with processing machine code data. This file can also supply "control settings" that allow you to further customize how machine code data is interpreted, and provide access to custom data tables for storing job, tool, and machine related data.
A custom CME file is typically created by Vericut or other services organization using the C Macro Extension – Application Programming Interface or CME–API (ref. CME-API in the Vericut Development Tools section in the Vericut Help Library). In this manner, you can customize Vericut's ability to simulate machine code data according to site-specific needs.
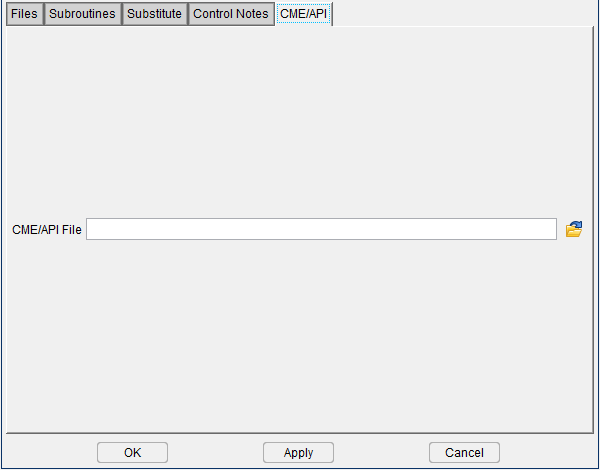
CME/API File — Enter the path/filename of the custom CME file to be used or click on the  (Browse) icon to display the Open CME File, file selection window and use it to specify the path/filename of the custom CME file to be used. Features on this window are standard file selection window features that enable you to navigate through directories, filter files, and type or select file names.
Using the Advanced Control Options Window
Add, Modify, or Delete Control Subroutine Files
Control Subroutine Files are external files containing subroutines accessible by the NC control file (.ctl)
To add a control subroutine file to the control file:
-
To add a control subroutine file, in the Advanced Control Options window: Subroutines tab click on the Add button to display the Control Subroutine Files file selection window.
You can also right-click in the File Names list area and select Add from the menu that displays, to display the Control Subroutine Files file selection window. -
In the Control Subroutine Files file selection window that displays, select the control subroutine file(s) to be added, then click OK. If needed, refer to Using the Control Subroutine Files File Selection Window section of Vericut Help.
The new control subroutine file name(s) are added to the File Names list on the Advanced Control Options window: Subroutines tab.
Make sure that you save the control file to update the control subroutines referenced by the control file.
To replace a control subroutine file in the File Names list with a different file:
-
To replace a control subroutine file with another, in the Advanced Control Options window: Subroutines tab, click on the control subroutine file in the File Names list that is to be replaced so that it becomes highlighted and then select Replace to display the Control Subroutine Files file selection window.
You can also click on the control subroutine file in the File Names list that is to be replaced so that it becomes highlighted and then right-click in the File names list area and select Replace in the menu that displays to display the Control Subroutine Files file selection window. -
In the Control Subroutine Files file selection window that displays, type, or select the /path/filename of the replacement NC program file, and then click OK. If needed, refer to Using the Control Subroutine Files File Selection Window section of Vericut Help.
The replacement control subroutine file name is added to the File Names list on the Advanced Control Options window: Subroutines tab.
Make sure that you save the control file to update the control subroutines referenced by the control file.
To delete a control subroutine file from the File Names list:
To delete a control subroutine file in the Advanced Control Options window: Subroutines tab, click on the control subroutine file in the File Names list that is to be deleted so that it becomes highlighted and then select Delete to delete the file from the File Names list.
You can also click on the control subroutine file in the File Names list that is to be deleted so that it becomes highlighted and then right-click in the File Names list area and select Delete in the menu that displays to delete the file from the File Names list.
To delete all control subroutines from the Advanced Control Options window: Subroutines tab File Names list, click on the Delete All button. All control subroutine files are removed from the File Names list.
📝 NOTE: Deleting subroutine files from the Vericut configuration does not delete the files from your computer.
Make sure that you save the control file to update the control subroutines referenced by the control file.
To edit a control subroutine from within Vericut:
-
To edit a control subroutine, in the Advanced Control Options window: Subroutines tab right-click on the control subroutine in the File Names list that is to be edited and then select Edit from the menu that displays.
-
The contents of the control subroutine file will display in a text editor window. (see Text File in the Utilities tab section for information about the text editor window). Edit the contents of the control subroutine file as necessary. When finished editing, select File tab > Save Project (or Save As) in the text editor main menu to save your changes.
- Select Exit in the text editor main menu to close the text editor window.
Also see Machine Settings window: Subroutines tab and Add, Modify, or Delete Machine Subroutines section of Vericut Help for information about "machine” subroutines.
Also see Configure NC Subroutines Branch menu section of Vericut Help for information about "NC subroutine" files.
Add, Modify, or Delete Text Substitutions
Using substitutions lets you to alter how Vericut "sees" data in a block without editing the G-Code NC program file. Substitutions occur at the beginning of processing each G-Code data block, prior to parsing block words and values into "tokens". Substitutions in the list are applied in listed order.
To learn more about how Vericut processes G-Code data, see "About Building NC Controls" section of Vericut Help.
To add a text substitution to the control configuration:
-
Click on
 (Control Advanced Options) in the Toolbar or Machine/Control tab > Control Advanced Options in the Vericut menu ribbon to display the Advanced Control Options window.
 -
Click the Substitute tab.
- On the Substitute tab, select the existing substitution record, to add the new substitution record after, so that it become highlighted.
- Press Add to add the new substitution record.
- Click on the Input Text field and enter the text that is to be replaced.
- Click on the Output Text field and enter the substitute text.
- Press OK to accept your addition and close the Advanced Control Options window or Apply to accept your addition and leave the Advanced Control Options window open for additional work.
When Vericut encounters the Input Text string during processing, it will substitute it with the Output Text string.
To modify an existing substitution in the control configuration:
-
Click on
(Control Advanced Options) in the Toolbar or Machine/Control tab > Control Advanced Options in the Vericut menu ribbon to display the Advanced Control Options window. -
Click the Substitute tab.
- On the Substitute tab, select the existing substitution record to be modified, so that it become highlighted.
-
Modify the Input Text / Output Text as required.
-
Press OK to accept your changes and close the Advanced Control Options window or Apply to accept your changes and leave the Advanced Control Options window open for additional work.
To delete a substitution from the control configuration:
-
Click on
(Control Advanced Options) in the Toolbar or Machine/Control tab > Control Advanced Options in the Vericut menu ribbon to display the Advanced Control Options window. -
Click the Substitute tab.
- On the Substitute tab, select the existing substitution record to be deleted, so that it become highlighted.
- Press Delete to remove the record from the list.
- Press OK to accept your changes and close the Advanced Control Options window or Apply to accept your changes and leave the Advanced Control Options window open for additional work.
See Advanced Control Options window: Substitute tab section of Vericut Help for more information.
Add, Modify, or Delete Optimization Substitutions
Using Optimization substitutions enable you to maintain text strings that are substituted when NC program files are optimized by Optimization and written to the Optimized file. Using substitutions lets you to alter what Vericut writes to optimized G-Code NC program file(s). Substitutions occur at the end of processing each G-Code data block, prior to outputting to the optimized NC program file.
To learn more about how Vericut processes G-Code data, see "About Building NC Controls" section of Vericut Help.