Learn From NC Program
Location:
File tab > Learn From NC Program
Status Bar icon: 
The Learn From NC Program button is used to activate the feature of the same name by left-clicking. If you right-click on the same button, the Learn From NC Program window will open on the Learn From NC Program setting, enabling you to set the parameters for how the program should run.
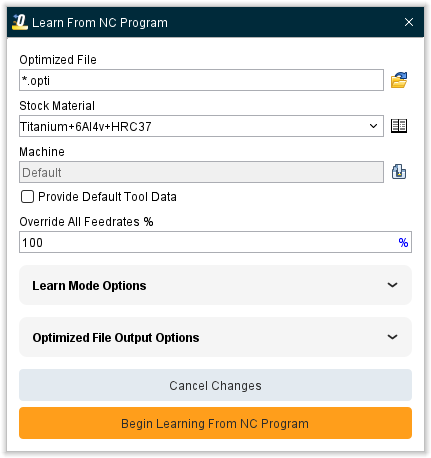
Optimized File — Use to specify the name of the modified (optimized) NC program file to receive optimized NC program data. Enter the *path*filename in the Optimized File text field or click on the  (Browse) icon and use the Optimized NC Program File file selection window to specify the \path\filename.
The format of this file, APT vs. G-Code, is the same as the tool path file being optimized. When an APT NC program is optimized the programmed "FEDRAT" records are commented out using "$$" and written to the modified path for reference. The Optimized File name must be different from that of the original NC program file. Optimization will not permit the original NC program file to be overwritten.
In many situations, there is more than 1 file being optimized. You might have multiple programs and you might have subroutine files that are being optimized. Therefore, in most cases, this field is specifying the rules for renaming the input files, and not the exact name of the optimized file.
For example, assume input file is test.mcd:
-
.opti *→** test.opti
-
opti_. → opti_test.mcd
-
\path*.* → \path\test.mcd
-
name.opti → name.opti
-
name → name
An ‘*’ before the dot means: put the original base file name here.
An ‘*’ after the dot means: put the original extension here.
📝 NOTE: The Optimized File name (including path) must be different from that of the original NC program file. Optimization will not permit the original NC program file to be overwritten.
The above rules apply to the main program and to subroutines except if a specific filename is specified (‘*’ is not used in the name) and there are more than 1 NC program files or if subroutine files are being optimized. It is highly recommended that if you are optimizing more than 1 program or are optimizing subroutine files, that you use one of the top 3 formats. The remainder of the documentation describes how this field applies to this one exception.
If we are optimizing multiple input files, and a specific optimize file name was given, we concatenate a sequence number. For example:
-
name.opti → name001.opti, name002.opti, …
-
name → name.001, name.002, …
-
\path\name → \path\name.001, \path\name.002, …
If we are optimizing a subroutine file, and a specific optimize file name was given, the subroutine name will be used rather than the specified name. For example: assume we are optimizing the subroutine “sub1.mcd”
-
name.opti → sub1.opti
-
name → sub1
-
\path\name.* → \path\sub1.mcd
Stock Material — Identifies the stock material being cut. The material name is changed via clicking the arrow and selecting from a list of available materials, or clicking in the data field and typing a new material name. Select the  icon to open the Stock Material Catalog window.
Machine — Identifies the NC machine being used to cut the workpiece. This feature functions similar to Stock Material described above. Select the  icon to change the machine via the Project Tree panel.
📝 NOTE: For optimization to occur the Stock Material and Machine names must match those of the desired Stock Material records in the Tool Library file.
Override All Feedrates % — Set the percentage to be overridden.
Begin Learning From NC Program — Starts the optimization process.
Apply Settings to All Setups — When pressed, all settings (including learn mode settings for the various tool types) are applied to all setups in the project. This saves time configuring a project for optimization since most of the settings do not change, and avoids making mistakes duplicating the Force Material File Directory location and other optimization settings between setups.
Provide Default Tool Data — When this option is toggled on (checked), the Learn From NC Program window provides a host of tool information. Default Tool Data (DTDs) seen in Tool Manager consider the current Stock Material, the Cutter’s teeth count and Force settings, and the Cutting Limits Source for cutting data. For tools imported with cutting data, DTD reflects imported cutting data values. For tools that do not have imported cutting data, Optimizer attempts to retrieve cutting data from Optimizer Tool Data for the current Stock Material. If cutting data isn’t found via either of those methods, then standard default SMR values are provided. In short, DTD data values are the same as a user gets when a new SMR is added to the Cutter.
Learn Mode Options
Reset and Optimize after Learning — If toggled "On", Optimizer automatically optimizes settings based on measured activity for each setting (e.g. chip thicknesses, cutting forces, spindle power, tool deflection, etc.), sorted from lowest to highest, then chooses values based on the “Learn Percentile” for each setting. Each learned value is based on that setting’s own measured/sorted activity, and may not necessarily be derived from the same cutting condition as other Force settings.
Update Optimization Settings for Existing Records — If toggled "On", existing Stock Material records are updated with new volume, chip thickness, and spindle speed values.
📝 NOTE: If Update Optimization Settings for Existing Records is toggled "On", and the same tool is loaded multiple times in the NC program, the Tool Library file produced by Learn From NC Program, will have only one record for the tool. The settings for the tool are based on the "worst case" cut condition of all cuts made with the tool during the current NC program. If toggled "Off", a record will be created for any optimizable tool that does not have a record. The record will only be created for the first occurrence of a tool.
Append to Existing Tool Library — If toggled "On", Learn From NC Program adds Stock Material records to the existing Tool Library file for the current project file. Otherwise the "Tool Library to be created" window will display enabling you to specify the /path/filename for the new Tool Library file to be created.
Create Stock Material Record per Tool Use — If toggled "On", this instructs Learn From NC Program to generate individuated Stock Material Records for each tool as it is used. These records can be accessed through the Stock Material Catalog window after the program is run.
Tool Learn Library — Use to specify the Tool Library file that is to receive the "learned" Stock Material records. Enter the *path*filename in the Tool Learn Library text field or click on the (Browse) icon and use the Tool Learn Library file selection window to specify the \path\filename.
Machine Max Feedrate — Displays the current highest feedrate possible for the selected machine. This field cannot be changed from this window.
Air Cut Feedrate — Displays the current feedrate for air cuts. Use the pulldown menu to specify Feed/Min, Feed/Rev, or % of Prog. as your units. This fieldi and pulldown menu can be edited by toggling off (not checked) the Default checkbox.
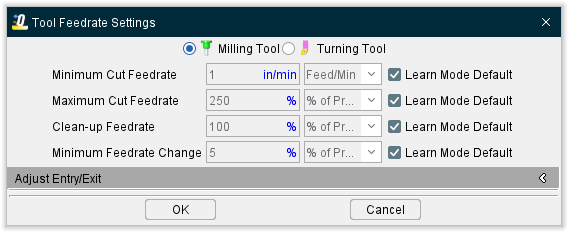
More Feedrate Settings — Opens the Tool Feedrate Settings window.
-
Milling Tool / Turning Tool toggle — Use to specify which tool type you will be adjusting settings for.
-
Minimum Cut Feedrate — specifies the minimum optimized feed rates that can be output when removing material. Default checkbox must be toggled off (not checked) in order to manually edit. When Default is toggled on (checked) it uses the setting 100% of Max Feed Rate for Direction Change. Use the pulldown menu to specify whether to use Feed/Rev or Feed/Min as your units.
-
Maximum Cut Feedrate — specifies the maximum optimized feed rates that can be output when removing material. Default checkbox must be toggled off (not checked) in order to manually edit. When Default is toggled on (checked) it uses the setting 150% of Max Feed Rate (90% of Clean Up Feedrate). Use the pulldown menu to specify whether to use % of Prog., Feed/Rev, or Feed/Min as your units.
-
Clean-up Feedrate — feedrate used when the tool is adjacent to, but not removing material. This condition is commonly referred to as a "spring pass". Default checkbox must be toggled off (not checked) in order to manually edit. When Default is toggled on (checked) it uses the setting 50% of Max Feed Rate. Use the pulldown menu to specify whether to use % of Prog., Feed/Rev, or Feed/Min as your units.
-
Minimum Feedrate Change — specifies the minimum change from the current optimized feed rate that will cause a new optimized feed rate to be output. This feature controls the quantity of feed rates output to the optimized NC program file. A small value causes more optimized feed rates to be output than when a larger value is entered. Default checkbox must be toggled off (not checked) in order to manually edit. When Default is toggled on (checked) it uses the setting the same as Minimum Cut Feedrate. Use the pulldown menu to specify whether to use % of Prog., Feed/Rev, or Feed/Min as your units.
-
Adjust Entry/Exit
-
Entry Feedrate — Use to specify when (by distance), and how (Feed/Min, Feed/Rev, % of Program, % of Calc), feed rates are calculated for entering material.
-
Exit Feedrate — Use to specify when, and how, feed rates are calculated for exiting material. Options are same as described for Entry Feedrate.
-
Options:
-
Off — Turns off Entry (or Exit) Feedrate calculation and application during optimization.
-
Feed/Minute — Uses the feed rate entered in the corresponding data field.
-
Feed/Revolution — Similar to Feed/Minute but calculated by each revolution of the fool rather than time.
-
% of Prog. — Adjusts the programmed feed rate based on the percentage entered in the corresponding data field. 100% uses the programmed feed rate as is, 50% cuts feed rate in half, etc.
-
% of Calc. — Similar to % of Prog. except adjusts the calculated feed rate.
-
Clearance Distance — Use to specify the distance before entering material to start applying the specified Entry Feedrate or Exit Feedrate.
-
Cut Distance — Use to specify the distance to cut into material, using the Entry Feedrate or Exit Feedrate, before normal feed rate optimization resumes.
Limit by — Use to toggle on (checked) Force, Power, Tool Deflection, and Volume options to act as limiters on Learn Mode to specify the optimization settings/limits (and their corresponding values) that Optimizer must learn from each tool in order to support optimizing via the chosen method. This option only appears when Optimization Method is set to Force.
Limit By — Use to toggle between Chip Thickness, Force, Power, Deflection, and Volume to specify the optimization settings/limits (and their corresponding values) that Optimizer must learn from each tool in order to support optimizing via the chosen method. You can toggle on (check) as many of these limiters as you want.
Learn Percentile — This feature determines what percentile of learned values (sorted in increasing order) is chosen for learned Force optimization settings. Learn mode now also uses this method, instead of learning from the most severe cutting condition. This method learns optimization values that produce safer and more consistent optimized feed rates than in previous versions.
-
Maximum (100%): chooses the value from 100% of the measured/sorted data (these are the highest values measured).
-
Aggressive (95%): (default) chooses the value from 95% of the measured/sorted data, ignoring the highest 5% of values.
-
Moderate (90%): chooses the value from 90% of the measured/sorted data, ignoring the highest 10% of values.
-
Conservative (85%): chooses the value from 85% of the measured/sorted data, ignoring the highest 15% of values.
-
Custom: enables users to specify any percentile value (via keying in or using the slider) for determining learned values for optimization setting(s).
The remaining group, Optimized File Output Options, is explained in the Optimize window section.
Cancel Changes — Removes all entered data and closes the window.
Begin Optimizing — Starts the optimization process.